Container Infra
Requirements for creating a Kubernetes cluster via OpenStack CLI
There are at least two ways to deploy a Kubernetes cluster to OpenStack, a) via the OpenStack portal, or b) via the OpenStack CLI (OSC), which is described here.
To create a Kubernetes cluster via OSC using a Kubernetes template provided by us, please first meet the requirements described below. You can also create your own Kubernetes templates.
- Basic knowledge of the Linux operating system (shell)
- Application Credentials with “Unrestricted (dangerous)” rights (See Create Application Credential)
- ssh Key Pairs you want to use to access (see Create ssh Key Pair OSC)
- Access to a running Linux VM with configured OpenStack Client (OSC) (See setup OSC)
- Installing the OpenStack client python-magnumclient (see 3.) install all openstack clients)
- Installation of the Kubernet CLI-Client (see here)
How to create a Kubernetes Cluster
The steps to be taken are
1.) Create Kubernetes Cluster
# Define application credentials (~/.config/openstack/clouds.yaml)
export OS_CLOUD=stage-app-coe1

# List available cluster templates
#(1) Single master cluster with floating IPs on master and worker nodes
#(2) Single master cluster without floating IPs
#(3) Multi master cluster with LB in front of master nodes

openstack coe cluster template list
+--------------------------------------+-----------------------------------+
| uuid                                 | name                              |
+--------------------------------------+-----------------------------------+
| 8f459ddd-1ef4-42f6-b496-77cef3039e26 | k8s-1.15.3-floating-ips           | (1)
| b83fda8d-1acd-4231-9680-ff1b122c2c98 | k8s-1.15.3-no-floating-ips        | (2)
| 1c6a2b97-2711-4f07-bc1c-76169729c04f | k8s-1.15.3-multi-master           | (3)
+--------------------------------------+-----------------------------------+

 # Create cluster
 openstack coe cluster create foo-k8s-cluster1 \
   --cluster-template k8s-1.15.3-floating-ips \
   --master-count 1 \
   --node-count 2 \
   --keypair foo-key

 # Wait util cluster status become CREATE_COMPLETE (appr. 10 minutes)
 openstack coe cluster list
2.) Configure and test Kubernetes cluster connection
Note
To execute the next step, you must ensure that you have the network PORT 6643 open to the public IP of the Kubernetes cluster from the server from which you are executing the commands. If you use a JumpServer and want to reach the Kubernetes Cluster via Private IP, you have to be in the same Security Group as the Kubernetes Cluster.
# Configure Kubernetes cluster connection
mkdir -p ~/kubernetes/foo-k8s-cluster1
openstack coe cluster config foo-k8s-cluster1 --dir ~/kubernetes/foo-k8s-cluster1
export KUBECONFIG=~/kubernetes/foo-k8s-cluster1/config

# Test connection to API server
curl -k  $(grep server ${KUBECONFIG} | awk '{print $2}')
# Output is something like the following
{
  "kind": "Status",
  "apiVersion": "v1",
  "metadata": {

  },
  "status": "Failure",
  "message": "forbidden: User \"system:anonymous\" cannot get path \"/\"",
  "reason": "Forbidden",
  "details": {

  },
  "code": 403
3.) Verify Kubernetes installation
# Verify Kubernetes installation
kubectl get pods --all-namespaces
    # Output is something like the following
NAMESPACE     NAME                                       READY   STATUS    RESTARTS   AGE
kube-system   coredns-dcc6d487d-b64mj                    1/1     Running   0          2m44s
kube-system   coredns-dcc6d487d-rx2x4                    1/1     Running   0          80s
kube-system   heapster-796547984d-vmznz                  1/1     Running   0          2m44s
kube-system   kube-dns-autoscaler-7865df57cd-gjg6b       1/1     Running   0          2m44s
kube-system   kubernetes-dashboard-f5496d66d-ncv8m       1/1     Running   0          2m44s
kube-system   openstack-cloud-controller-manager-s2p8l   1/1     Running   2          2m45s

# List available cluster nodes
kubectl get nodes -o wide
    # Output is something like the following
NAME                                     STATUS   ROLES    AGE     VERSION   INTERNAL-IP   EXTERNAL-IP     OS-IMAGE                       KERNEL-VERSION          CONTAINER-RUNTIME
foo-k8s-cluster1-v5qkwlpyvmlw-master-0   Ready    master   2m58s   v1.15.3   10.0.0.19     217.20.192.28   Debian GNU/Linux 9 (stretch)   5.0.9-200.fc29.x86_64   docker://1.13.1
foo-k8s-cluster1-v5qkwlpyvmlw-minion-0   Ready    <none>   2m58s   v1.15.3   10.0.0.11     217.20.192.43   Debian GNU/Linux 9 (stretch)   5.0.9-200.fc29.x86_64   docker://1.13.1
foo-k8s-cluster1-v5qkwlpyvmlw-minion-1   Ready    <none>   2m58s   v1.15.3   10.0.0.8      217.20.192.21   Debian GNU/Linux 9 (stretch)   5.0.9-200.fc29.x86_64   docker://1.13.1

# Deploy test nginx container
kubectl create deployment nginx --image=nginx
kubectl scale deployment --replicas 2 nginx

kubectl get pods -o wide
NAME                   READY   STATUS    RESTARTS   AGE   IP            NODE                                     NOMINATED NODE   READINESS GATES
nginx-5c7588df-dc657   1/1     Running   0          58s   10.100.48.3   foo-k8s-cluster1-v5qkwlpyvmlw-minion-0   <none>           <none>
nginx-5c7588df-hqwps   1/1     Running   0          54s   10.100.93.6   foo-k8s-cluster1-v5qkwlpyvmlw-minion-1   <none>           <none>

# Create LoadBalancer
kubectl expose deployment nginx --type=LoadBalancer --name=nginx --port=80

# Wait for external IP!
kubectl get services -o wide
NAME         TYPE           CLUSTER-IP       EXTERNAL-IP     PORT(S)        AGE     SELECTOR
kubernetes   ClusterIP      10.254.0.1       <none>          443/TCP        10m     <none>
nginx        LoadBalancer   10.254.239.133   217.20.192.22   80:32567/TCP   5m56s   app=nginx

# Test connection to LB
curl http://217.20.192.22 -I
    # Output is something like the following
 HTTP/1.1 200 OK
 Server: nginx/1.17.3
 Date: Tue, 24 Sep 2019 06:29:04 GMT
 Content-Type: text/html
 Content-Length: 612
 Last-Modified: Tue, 13 Aug 2019 08:50:00 GMT
 Connection: keep-alive
 ETag: "5d5279b8-264"
 Accept-Ranges: bytes
4.) Configure Kubernetes dashboard
# Configure Kubernetes dasboard
cat <<EOF | kubectl apply -f -
apiVersion: v1
kind: ServiceAccount
metadata:
  name: admin-user
  namespace: kube-system
EOF

     # Output is something like the following
     serviceaccount/admin-user created

cat <<EOF | kubectl apply -f -
apiVersion: rbac.authorization.k8s.io/v1
kind: ClusterRoleBinding
metadata:
  name: admin-user
roleRef:
  apiGroup: rbac.authorization.k8s.io
  kind: ClusterRole
  name: cluster-admin
subjects:
- kind: ServiceAccount
  name: admin-user
  namespace: kube-system
EOF

# Output is something like the following
clusterrolebinding.rbac.authorization.k8s.io/admin-user created

# Get dasboard token
kubectl -n kube-system describe secret $(kubectl -n kube-system get secret | grep admin-user | awk '{print $1}') | grep token: | awk '{print $2}'

# Start proxy to dashboard
kubectl proxy

# Test connection to Kubernetes dashboard by curl
curl http://localhost:8001/api/v1/namespaces/kube-system/services/https:kubernetes-dashboard:/proxy/

# If the connection is working, the output is something like the following
<!doctype html> <html ng-app="kubernetesDashboard"> <head> <meta charset="utf-8"> <title ng-controller="kdTitle as $ctrl" ng-bin      d="$ctrl.title()"></title> <link rel="icon" type="image/png" href="assets/images/kubernetes-logo.png"> <meta name="viewport" cont      ent="width=device-width"> <link rel="stylesheet" href="static/vendor.93db0a0d.css"> <link rel="stylesheet" href="static/app.93e25    9f7.css"> </head> <body ng-controller="kdMain as $ctrl"> <!--[if lt IE 10]>
<p class="browsehappy">You are using an <strong>outdated</strong> browser.
Please <a href="http://browsehappy.com/">upgrade your browser</a> to improve your
experience.</p><![endif]--> <kd-login layout="column" layout-fill="" ng-if="$ctrl.isLoginState()"> </kd-login> <kd-chrome layout="column" layout-fill="" ng-if="!$ctrl.isLoginState()"> </kd-chrome> <script src="static/vendor.bd425c26.js"></script> <script src="api/appConfig.json"></script> <script src="static/app.b5ad51ac.js"></script> </body> </html>
5.) Login Kubernetes dashboard
Open a browser (e.g. Chrome) and enter the URL of the Kubernetes dashboard.
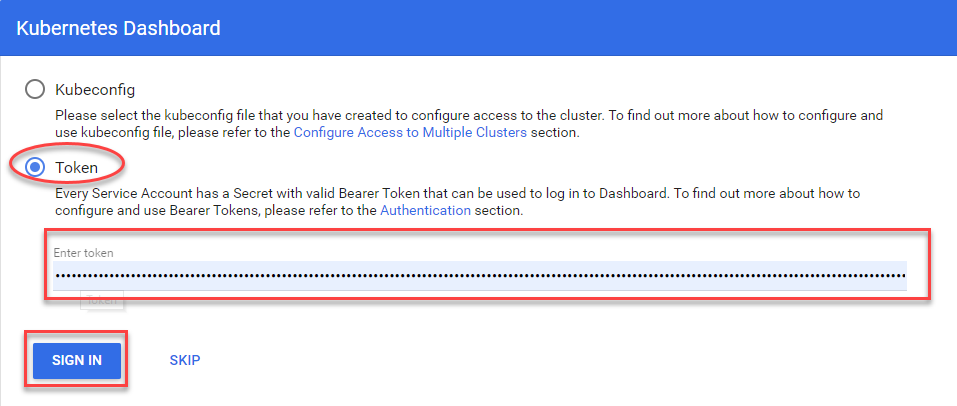
- Select Token, enter the dashboard token received in step 4 and click on “SIGN IN”

- Now the Kubernetes Dashboard of the created cluster appears.
Note
If access to the dashboard does not work, you may not have unlocked the required PORT. If you have configured your Kubernetes cluster with Putty from a Windows system and cannot access it due to PORT restrictions, you may want to connect via “SSH Tunnel on PuTTY” see puttysshtunnel.
How to install the Kubernetes CLI client
# Install Kubernetes CLI client
#
# Ubuntu / Debian
#

# Add repository
curl -s https://packages.cloud.google.com/apt/doc/apt-key.gpg | sudo apt-key add -
echo "deb https://apt.kubernetes.io/ kubernetes-xenial main" | sudo tee -a /etc/apt/sources.list.d/kubernetes.list
sudo apt-get update

# Install tools
sudo apt-get install -y kubectl
#sudo apt-get install -y kubeadm

# Extend BASH completion
kubectl completion bash | sudo tee /etc/bash_completion.d/kubectl

#
# Other Linux distributions
#
curl -LO https://storage.googleapis.com/kubernetes-release/release/$(curl -s https://storage.googleapis.com/kubernetes-release/release/stable.txt)/bin/linux/amd64/kubectl
chmod +x ./kubectl
sudo mv ./kubectl /usr/local/bin/kubectl

#
# Links
#
https://kubernetes.io/docs/tasks/tools/install-kubectl/
https://kubernetes.io/docs/reference/setup-tools/kubeadm/kubeadm-init/
How to create your own openstack Kubernetes COE cluster templates
With the following command you can optionally create your own openstack Kubernetes COE cluster templates.
# Optional: You can create your own COE templates with:
openstack coe cluster template create YOUR_TEMPLATE_NAME \
  --image "Fedora AtomicHost 29" \
  --external-network public \
  --dns-nameserver 8.8.8.8 \
  --master-flavor m1.medium \
  --flavor m1.medium \
  --coe kubernetes \
  --volume-driver cinder \
  --network-driver flannel \
  --docker-volume-size 40 \
  --public \
  --labels kube_tag=v1.15.3,cloud_provider_tag=v1.15.0,availability_zone=ch-zh1-az1 \
  --floating-ip-disabled
Note
When creating the COE template, the parameter –labels must specify the Availability ZONE (ch-zh1-az1 or ch-zh1-az2) in which the COE cluster should be created.