3. S3 Object Storage
Table of Contents
In this area you manage your S3 objects (buckets, files) including the project and panel user permissions and S3 EC2 credentials (access key and secret).
3.1. Overview S3 Management
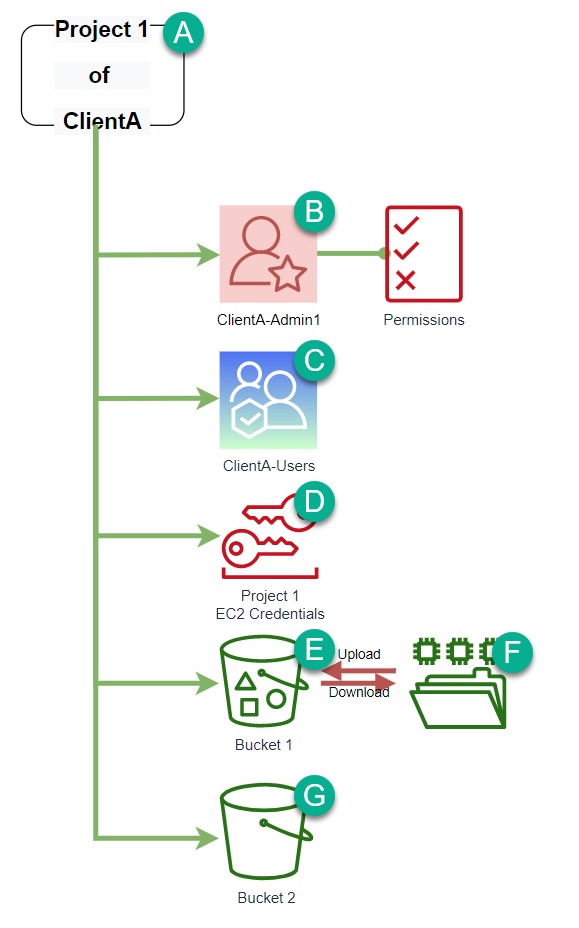
The following image illustrates the objects that you can manage in the Cloud Service Portal under S3 Object Storage. The structure refers to a project. If required, you can create and manage several projects.
To be able to use S3, you need at least:
- one project
- a user with S3 Panel permissions
- EC2 Credentials (API & Secred Key)
- one Bucket
| Element | Description |
|---|---|
|
Permissions, buckets and EC2 credentials always belong to a project. |
|
The Client Admin is a user with extended rights and manages the projects and users and regulates their authorization. |
|
The client user sees the projects and buckets for which he has been authorized. |
|
Access to buckets within a project is authorized via so-called EC2 credentials [1]. |
|
Buckets [2] is like a collection container for the objects (files) that are to be stored in the Object Storage. |
|
In the S3 Object Storage Panel single files can be uploaded or downloaded [3]. |
|
You can create multiple buckets to better organize objects. |
| [1] | An EC2 credential consists of an API and Secret Key and belongs to the project. You can create multiple EC2 credentials per project. Through access via EC2 credentials, all buckets in a project are always visible. It is also possible to use user-bound EC2 credentials. |
| [2] | Any number of buckets can be created in a project as part of fair usage. |
| [3] | Larger amounts of data are usually loaded with an external tool (e.g. S3 Explorer or S3 CLI). |
3.2. Manage S3 Dashboard Permissions
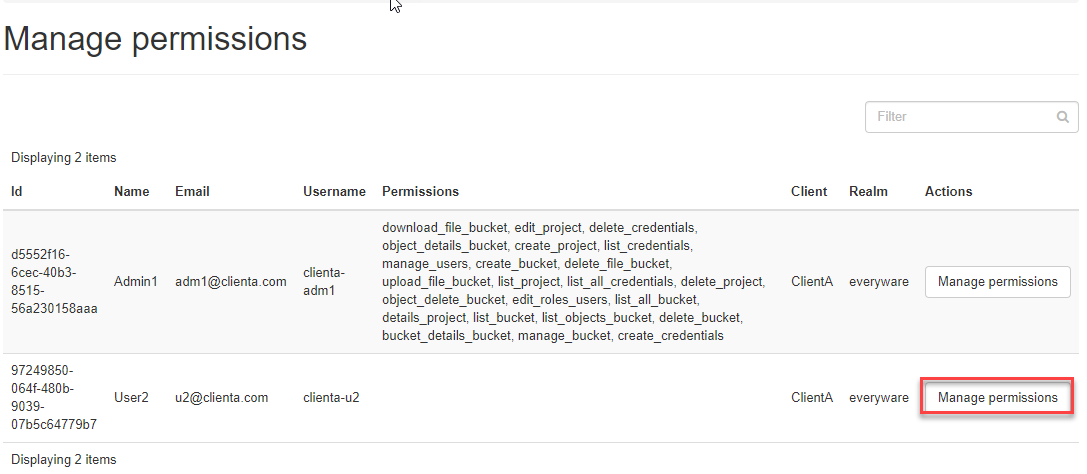
In order for a user to access the S3 Dashboard, the necessary permissions must first be granted.
- To do this, navigate to S3 Object Storage on the left and then to Manage permissions.
Note
Die User Berechtigung auf das S3 Panel ist unabhängig von den Berechtigungen auf ein Projekt oder Bucket. Falls Sie diesen Menüpunkt nicht haben, wenden Sie sich bitte an ihren Enterprise Partner Support.
- Now please click on the Manage user button on the right side of the corresponding project
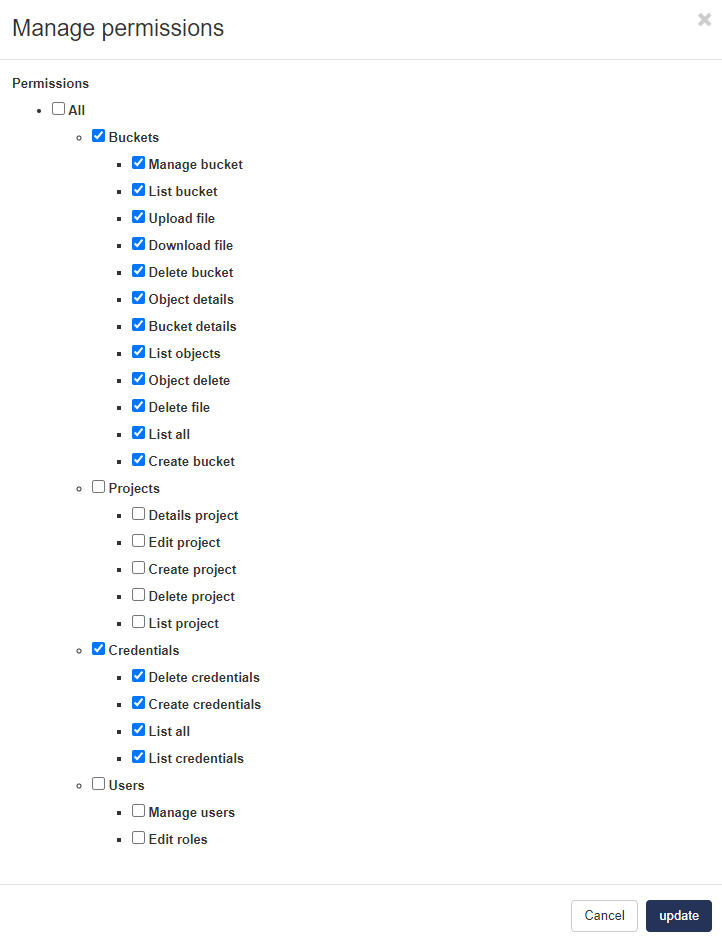
- Now set the desired permissions for this user depending on the task and then click update.
3.3. Overview S3 Dashboard
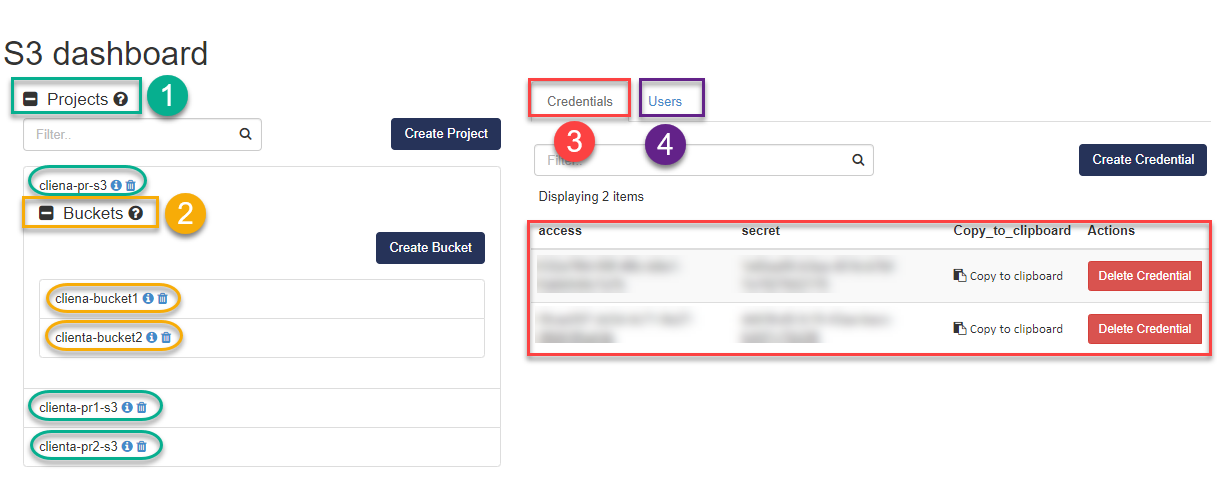
The following image illustrates the structure of the elements that you can manage in the Cloud Service Portal under S3 Dashboard.
| Element | Description |
|---|---|
| Project Ebene (1) | Isolated group of Project permissions (4), buckets (2), and EC2 credentials (3). |
| Bucket Level (2) | List of buckets of this project |
| EC2 Credentials (3) | Management of the EC2 credentials that belong to this project. |
| Users (4) | Management of the user permissions for this project. |
As soon as you click on a project (1) and then on a bucket (2), the bucket objects (if available) and further features (3) such as MPUs (Multi Part Uploads) are displayed.
Note
MPU - After you initiate a multipart upload (MPU) and upload one or more parts, they will be listed in the MPUs TAB. You must either complete or stop the multipart upload to stop being charged for the uploaded parts. Only after you have either completed or stopped a multi-part upload will S3 release the part storage and no longer charge you for the part storage.
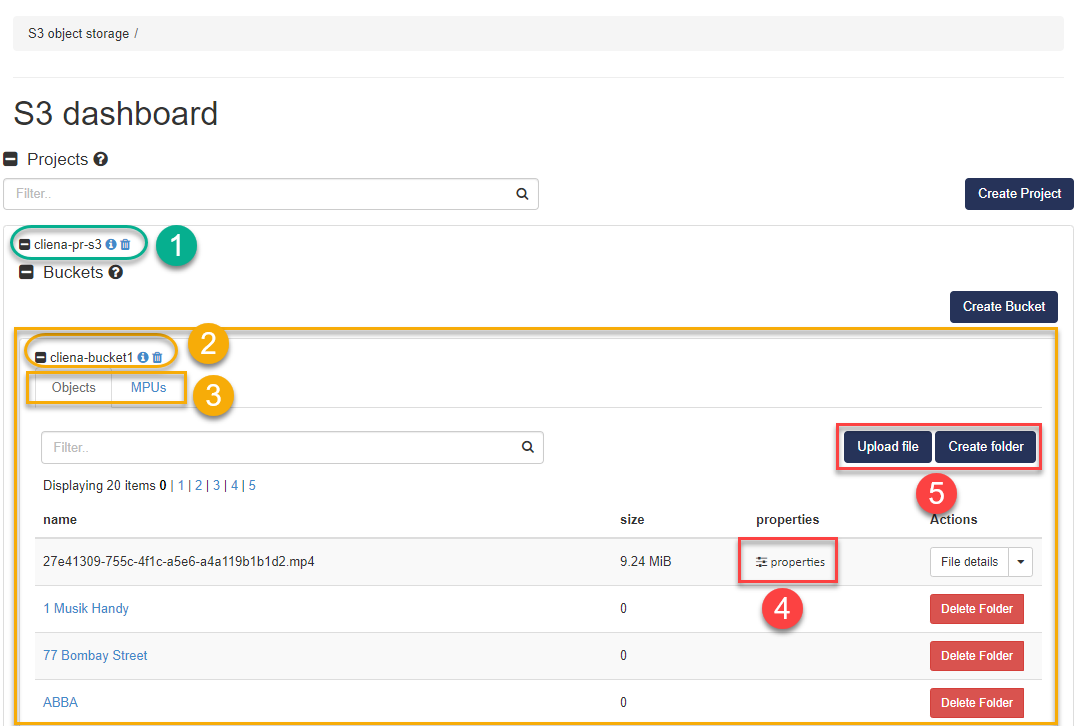
| Element | Description |
|---|---|
| Project (1) | Selected Project with Bucket (2)and Object List |
| Feature TAB’s (3) | Objects TAB with the objects and MPU TAB with the list of incomplete multipart uploads |
| Object details (4) | By clicking on the Properties column (4) of an object, further details of the object are displayed |
| Buttons (5) | With the help of the “Upload file” and “Create Folder” buttons (5) further objects can be created in this bucket. |
3.4. Create Project
To manage your buckets, users, and EC2 credentials, first create a project. Multiple buckets, users, and EC2 credentials can be managed in one project.
Note
Möglicherweise hat ihr Enterprise Partner für Sie bereits ein Projekt erstellt und Sie können direkt mit dem erstellen von Credentials fortfahren.
Within the scope of fair use, you can create several projects depending on the order.
- To do this, navigate to S3 Object Storage on the left and then to Buckets.
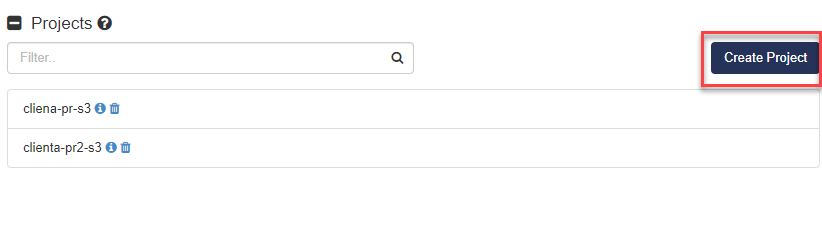
- Now please click on the Create Project button
- Now enter a project name and a description.
- Please select object-storage [4] as quota profile.
- Then click on the Create button
| [4] | Profile object-storage - This special quota profile contains only #Projects quotas to avoid accidental usage of other resources (e.g. CPU, RAM). |

- The project has been created and is displayed in the list.
- Now grant the user permissions for this project.
Note
A note appears stating that you still need to create a credential for this project before you can create a bucket.
3.5. Manage Project User
If you are authorized to create and manage projects yourself, you can create additional users and authorize them for projects. This authorization is not necessary for access to a bucket.
To create a user or to authorize an existing user to one or more projects, please proceed as follows.
- To do this, navigate to S3 Object Storage on the left and then to Buckets.
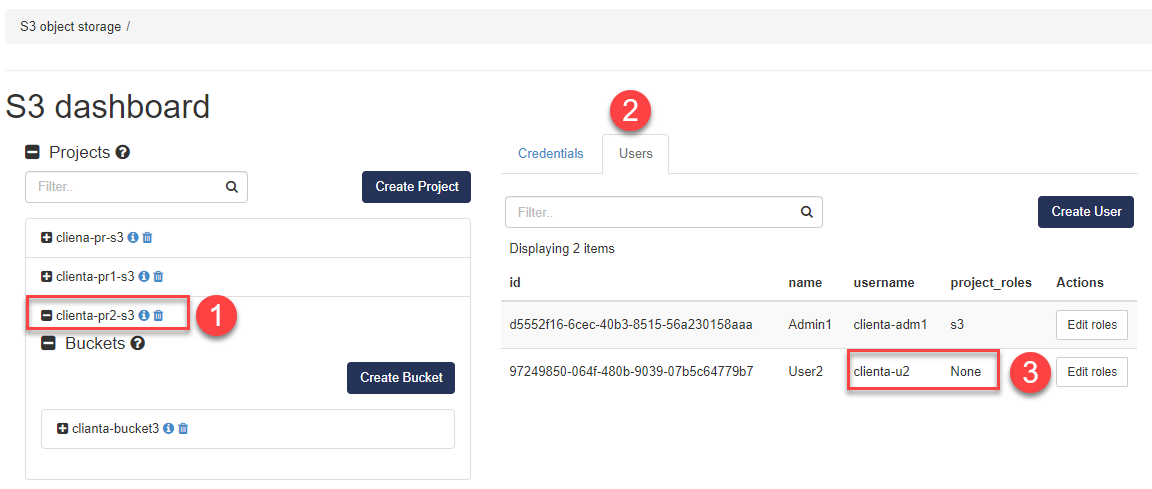
- First click on the project (1) for which you would like to grant a user authorization
- Next, please click on the Users TAB (2) on the right
- Now click on Edit roles (3) on the right side of the line of the corresponding user.
- Now tick the s3 box and confirm with the create button
- With the button Create User you can directly create a new user.
3.6. Create EC2 Credentials
Before you can create buckets, you must have created at least one EC2 credential.
- To do this, navigate to S3 Object Storage on the left and then to Buckets.
- First click on the project (1) for which you want to create an EC2 credential
- Then click on the right TAB the Create Credentials button
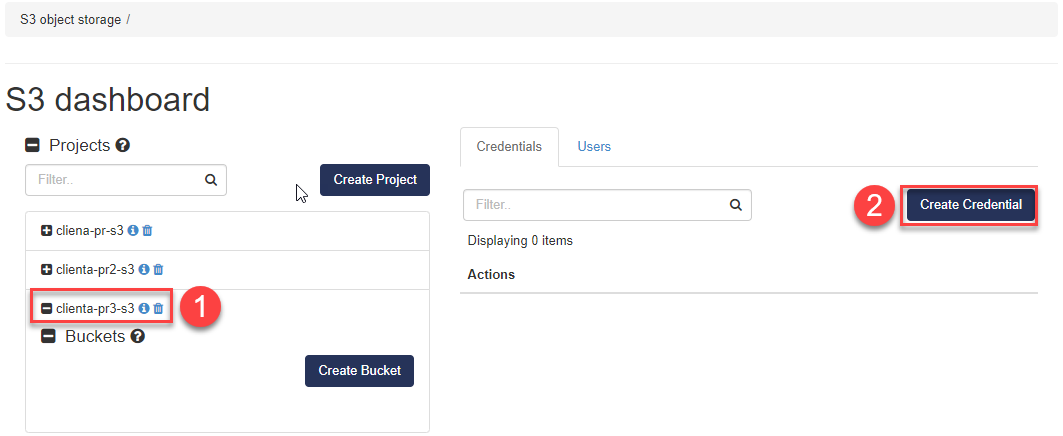
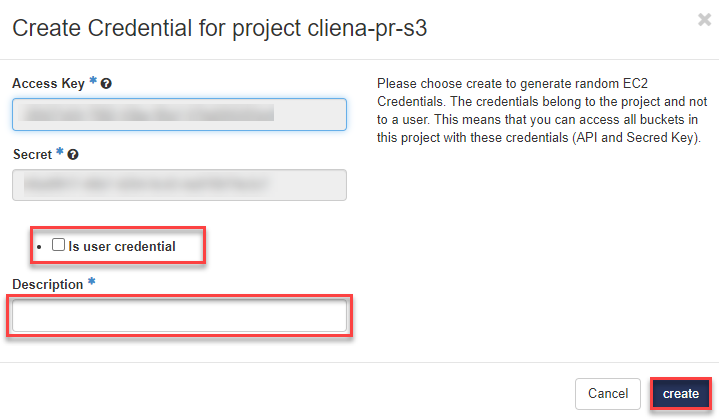
- The created EC2 credentials are displayed
- Enter a description for the use of these credentials
- If you are authorized [5], you can also create user bound EC2 credentials with the flag is user credentials
- Complete your entry and click create
| [5] | To create user-bound EC2 credentials, you must have successfully logged in to the OpenStack Management Portal in advance. If this requirement is not met, the User Credential option will not appear. |
- The EC2 credential has been created for this project and is displayed in the list.
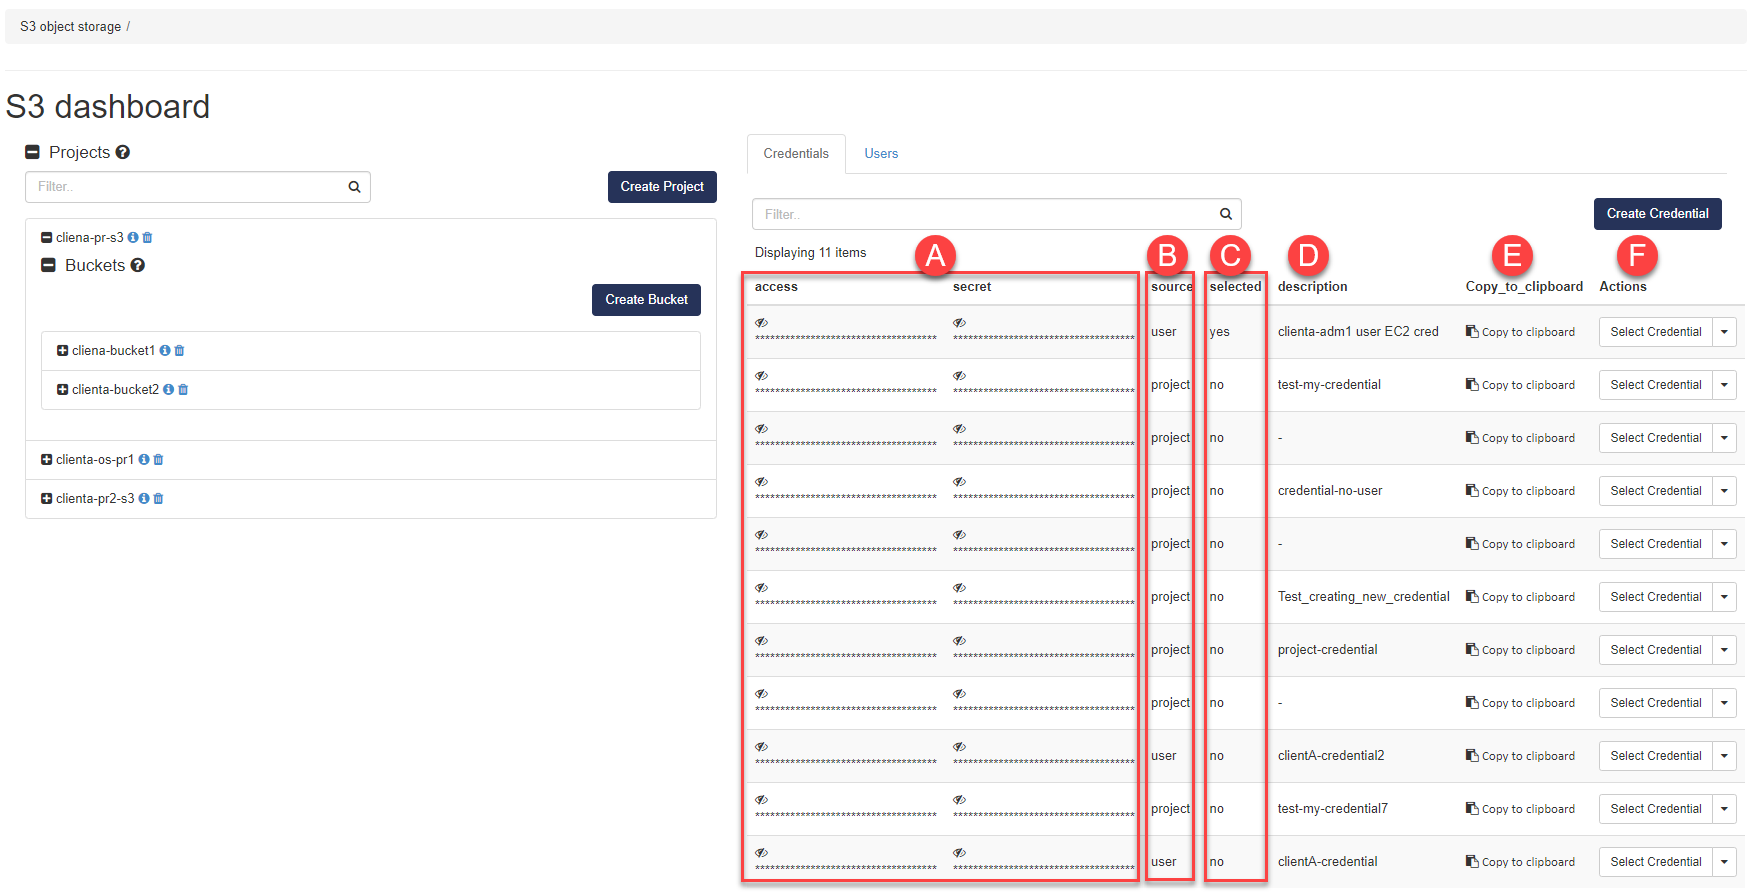
- A) Access and Secred Key - Click on the eye icon to display it.
- B) Source - Indicates whether this is a User [6] or Project bound EC2 credential.
- C) Selected - Indicates with which EC2 credential the S3 objects are queried in the Cloud Service Portal. You can specify this with the action button F) Select Credentials.
- D) Selected - Description of the EC2 Credential
- E) Copy_to_clipboard - By clicking on this column, the API and Secred Key will be copied to the clipboard.
- F) Actions - see C). By clicking on the arrow, the selection for deleting the EC2 credential appears.
| [6] | Only the user bound EC2 credentials of the logged in user are displayed! |
- Now create your bucket.
3.7. Create Bucket
To create a bucket, please proceed as follows.
- To do this, navigate to S3 Object Storage on the left and then to Buckets.
- First click on the project (1) in which you want to create a bucket
- Now please click on the Create Project button
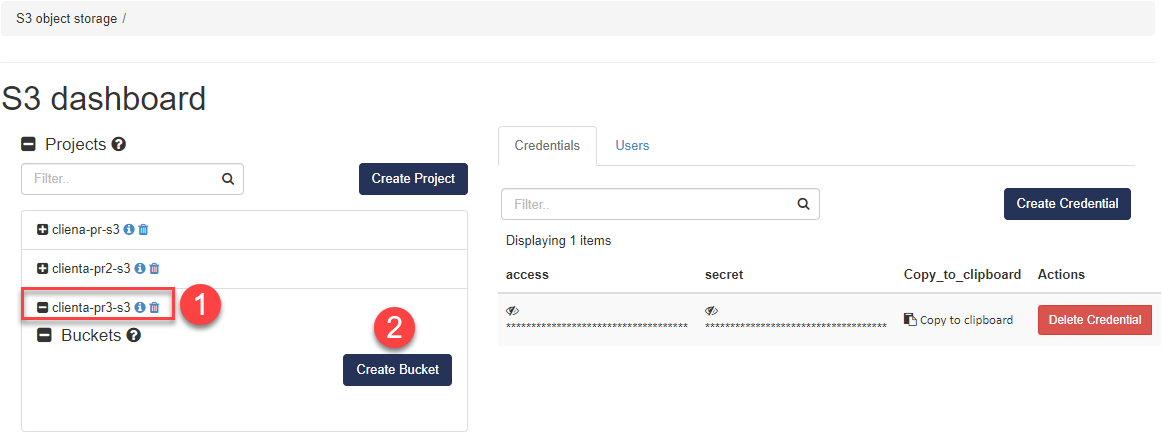
- Enter a name and click create
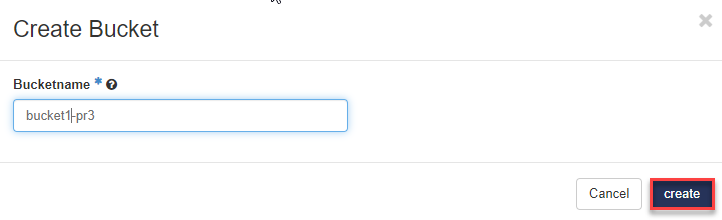
Note
Please note the restrictions on the bucket name.
3.7.1. Restrictions bucket names
In general, bucket names should follow the restrictions for domain names.
- Bucket names can contain lowercase letters, numbers, and hyphens. Each label must begin and end with a lowercase letter or number.
- Bucket names must be unique.
- Bucket names cannot be formatted as IP addresses.
- Bucket names can be between 3 and 63 characters long.
- Bucket names must not contain capital letters or underscores.
- Bucket names must begin with a lowercase letter or number.
3.8. Upload Files
After you have created a bucket, you can now upload or download individual files in the S3 panel.
- To do this, navigate to S3 Object Storage on the left and then to project then to the Bucket.
- Then click on right the Upload File button(3)
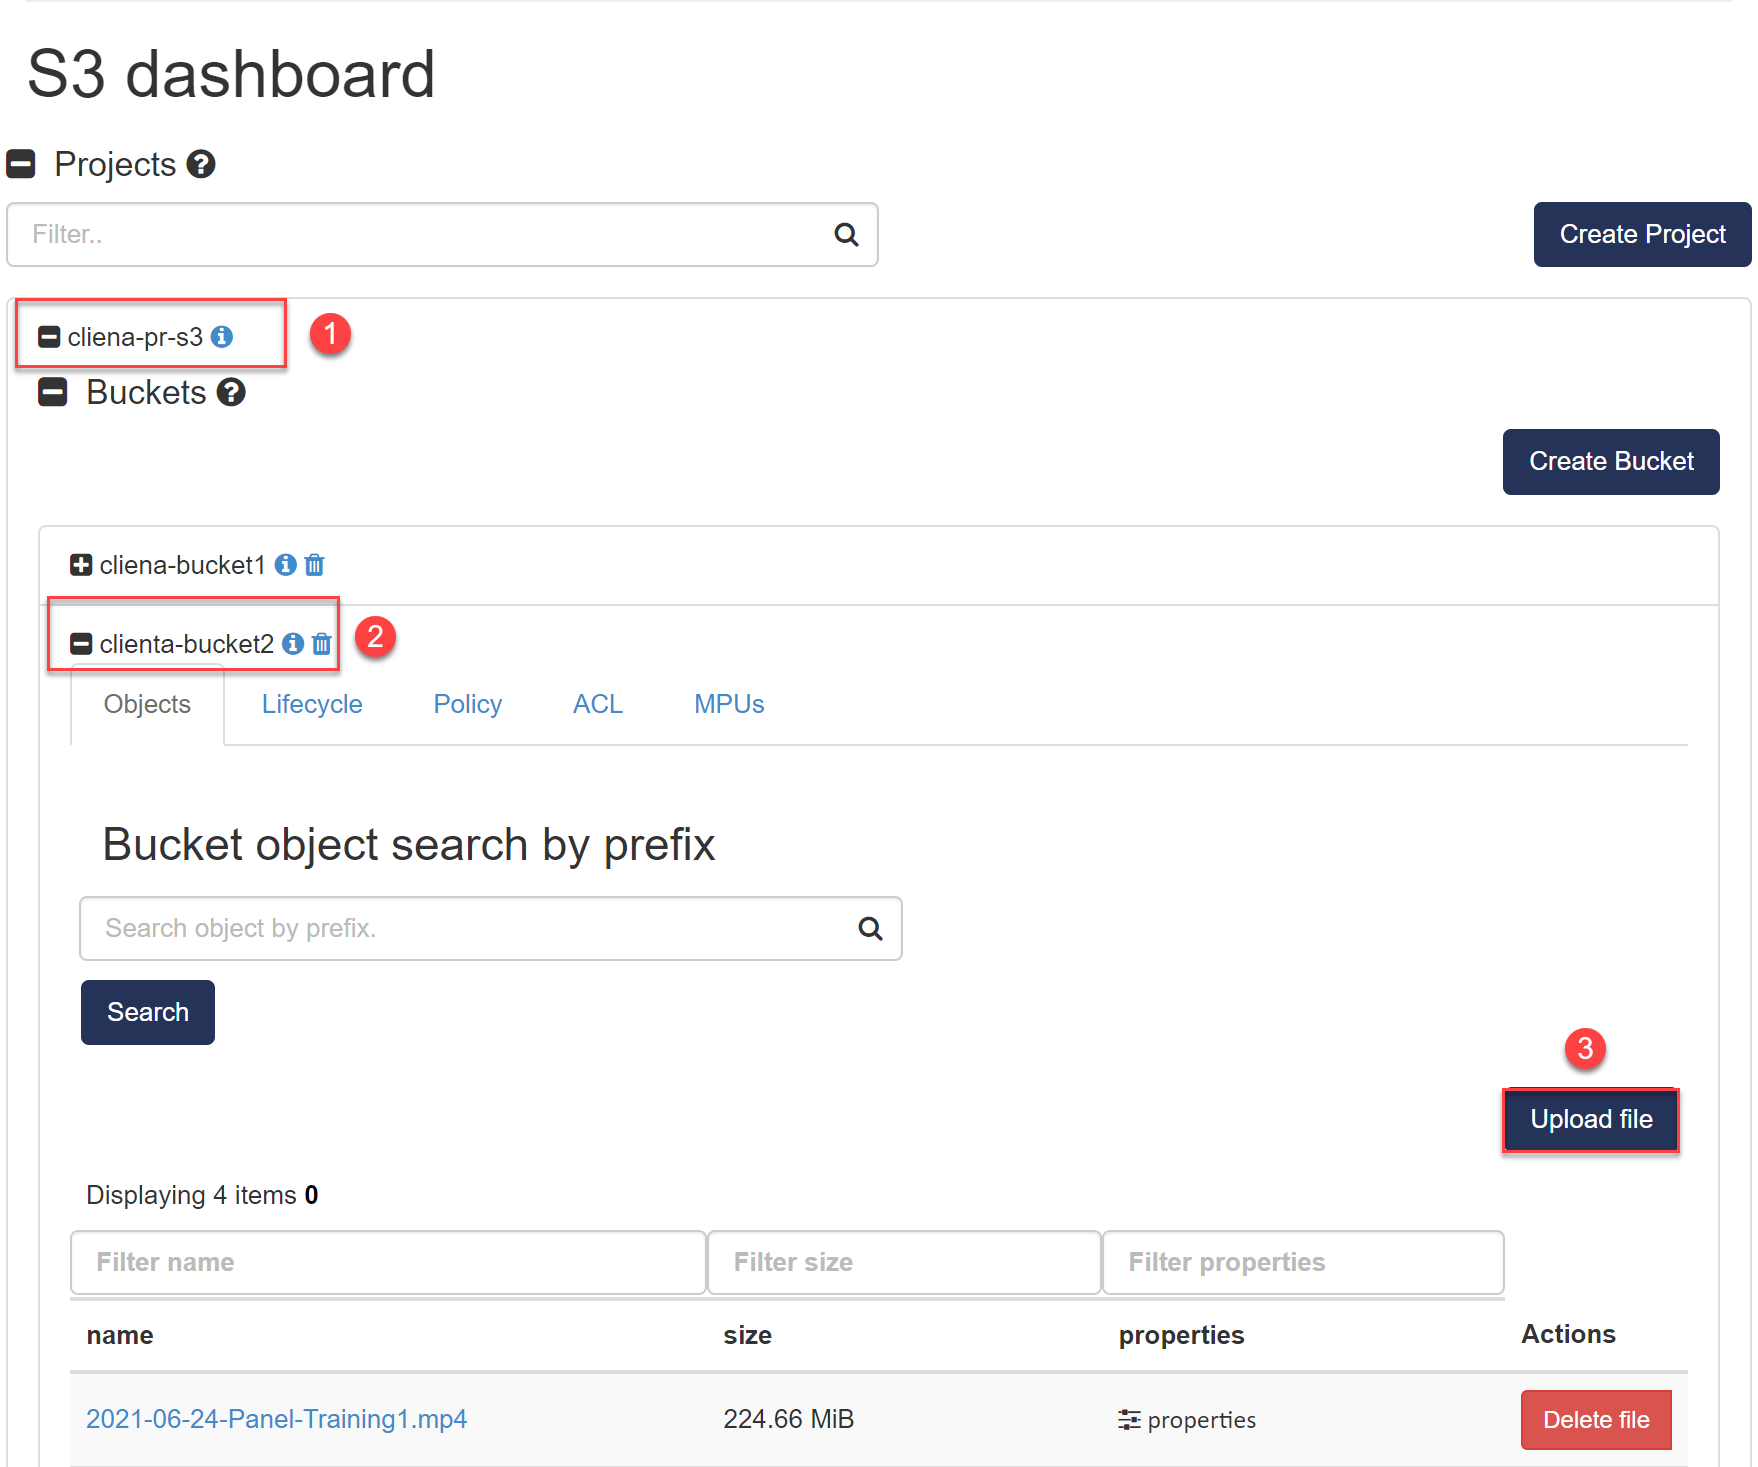
- The S3 Upload Manager appears in a new browser TAB.
- Now open your file explorer and drag & drop (with the left mouse button) single files or whole directories to the upload list within the dashed area (1).
- Once you have added all the objects you want to upload, start the upload process by clicking Start uploading (3).
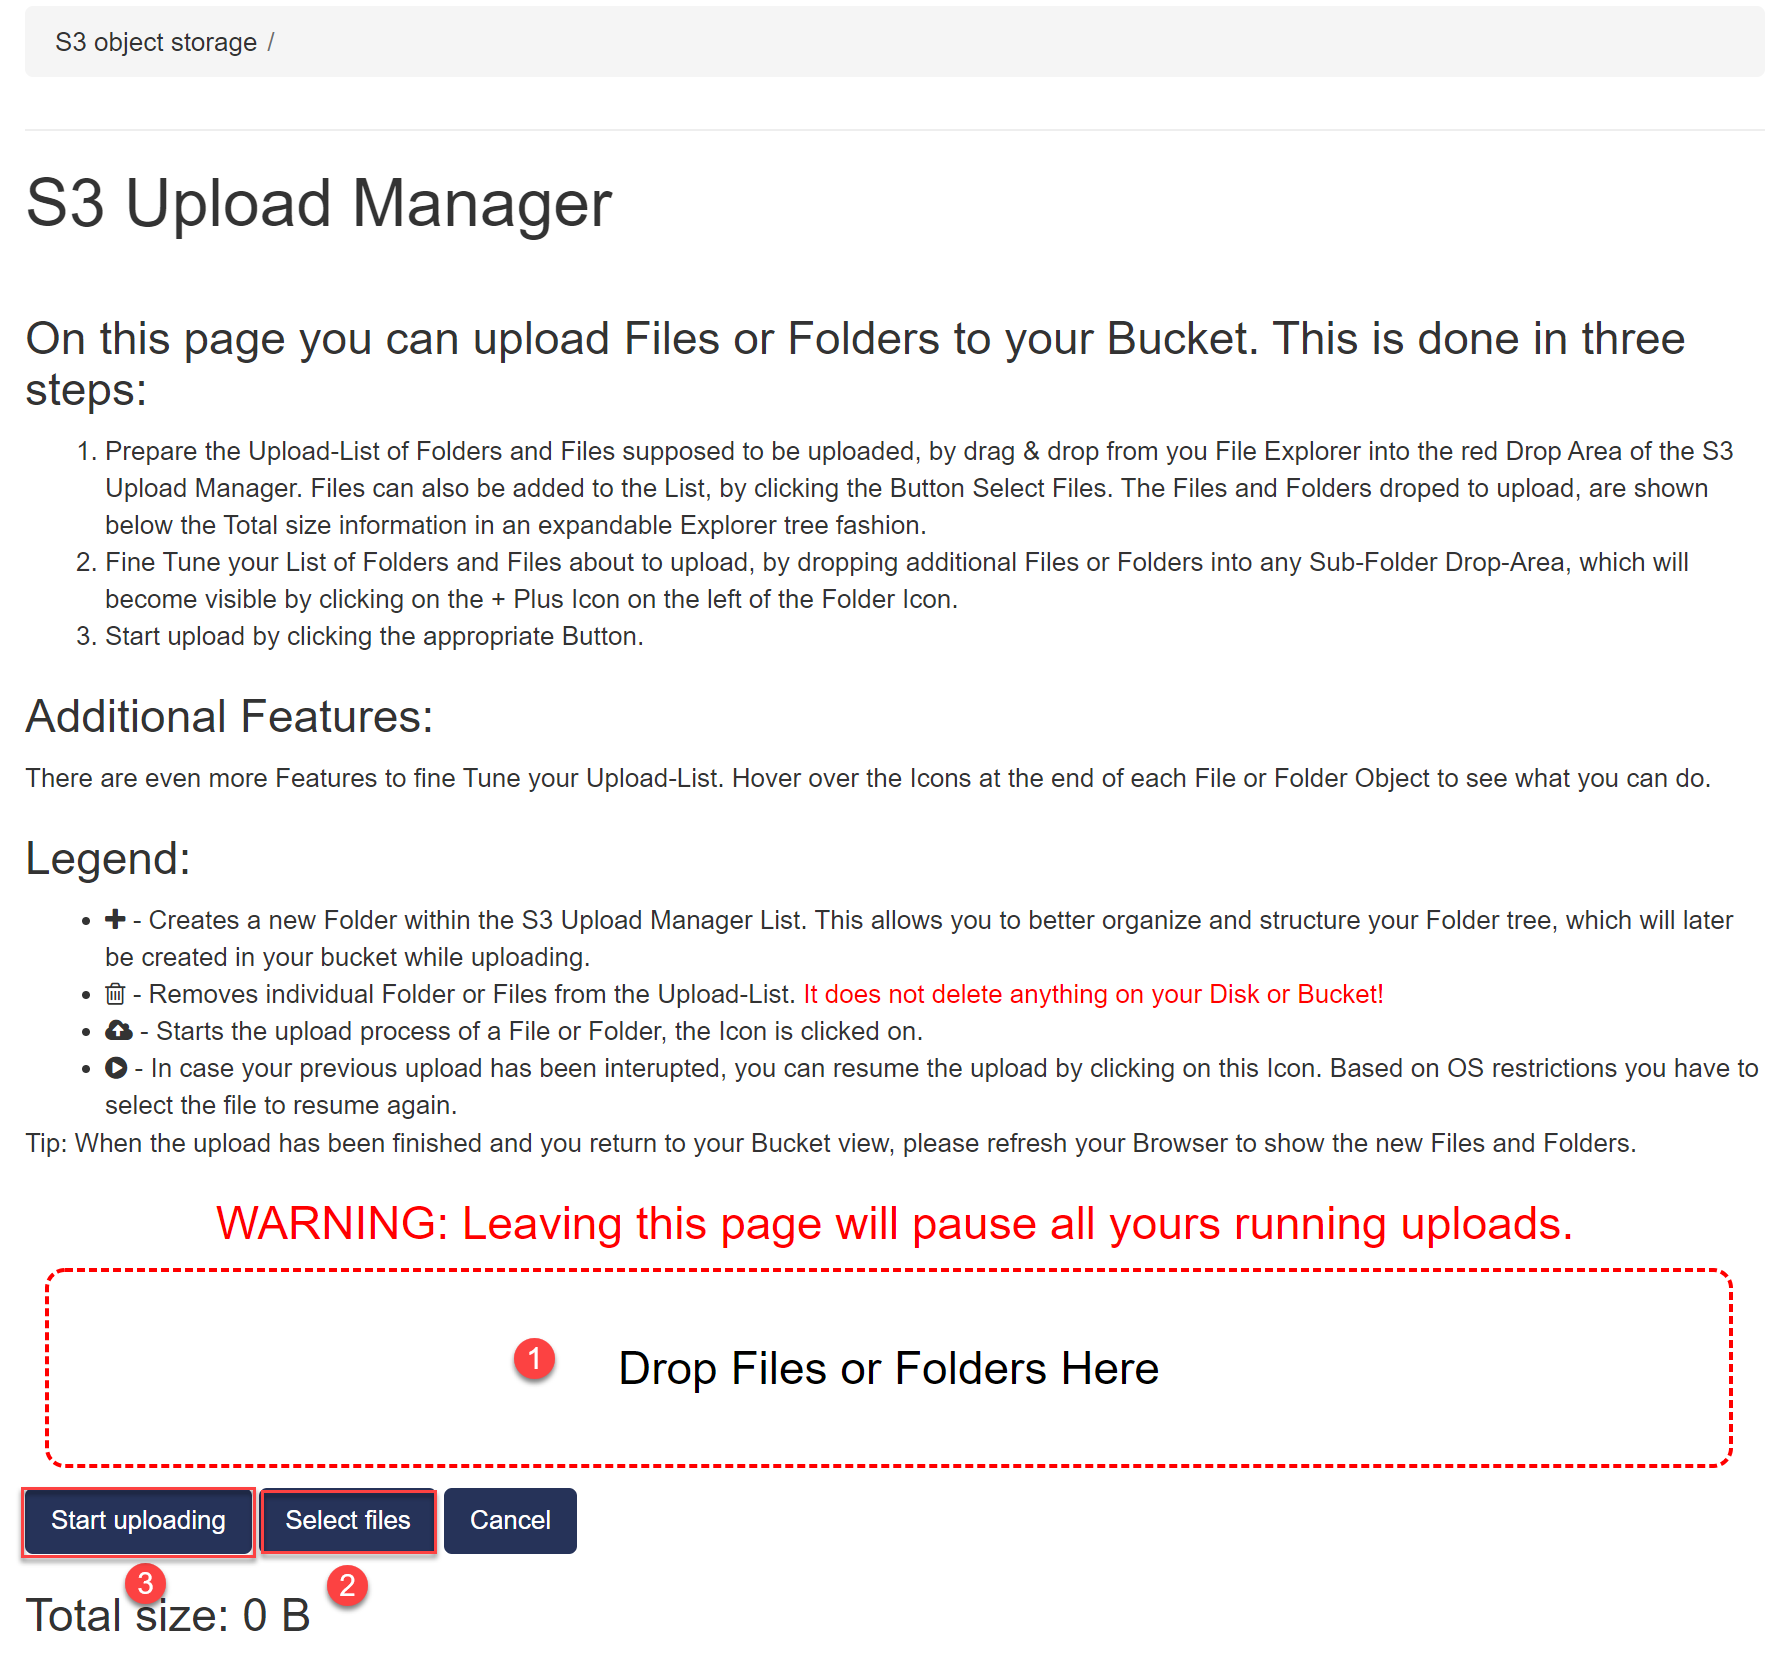
- Alternatively, you can add individual files by clicking Select files (2).
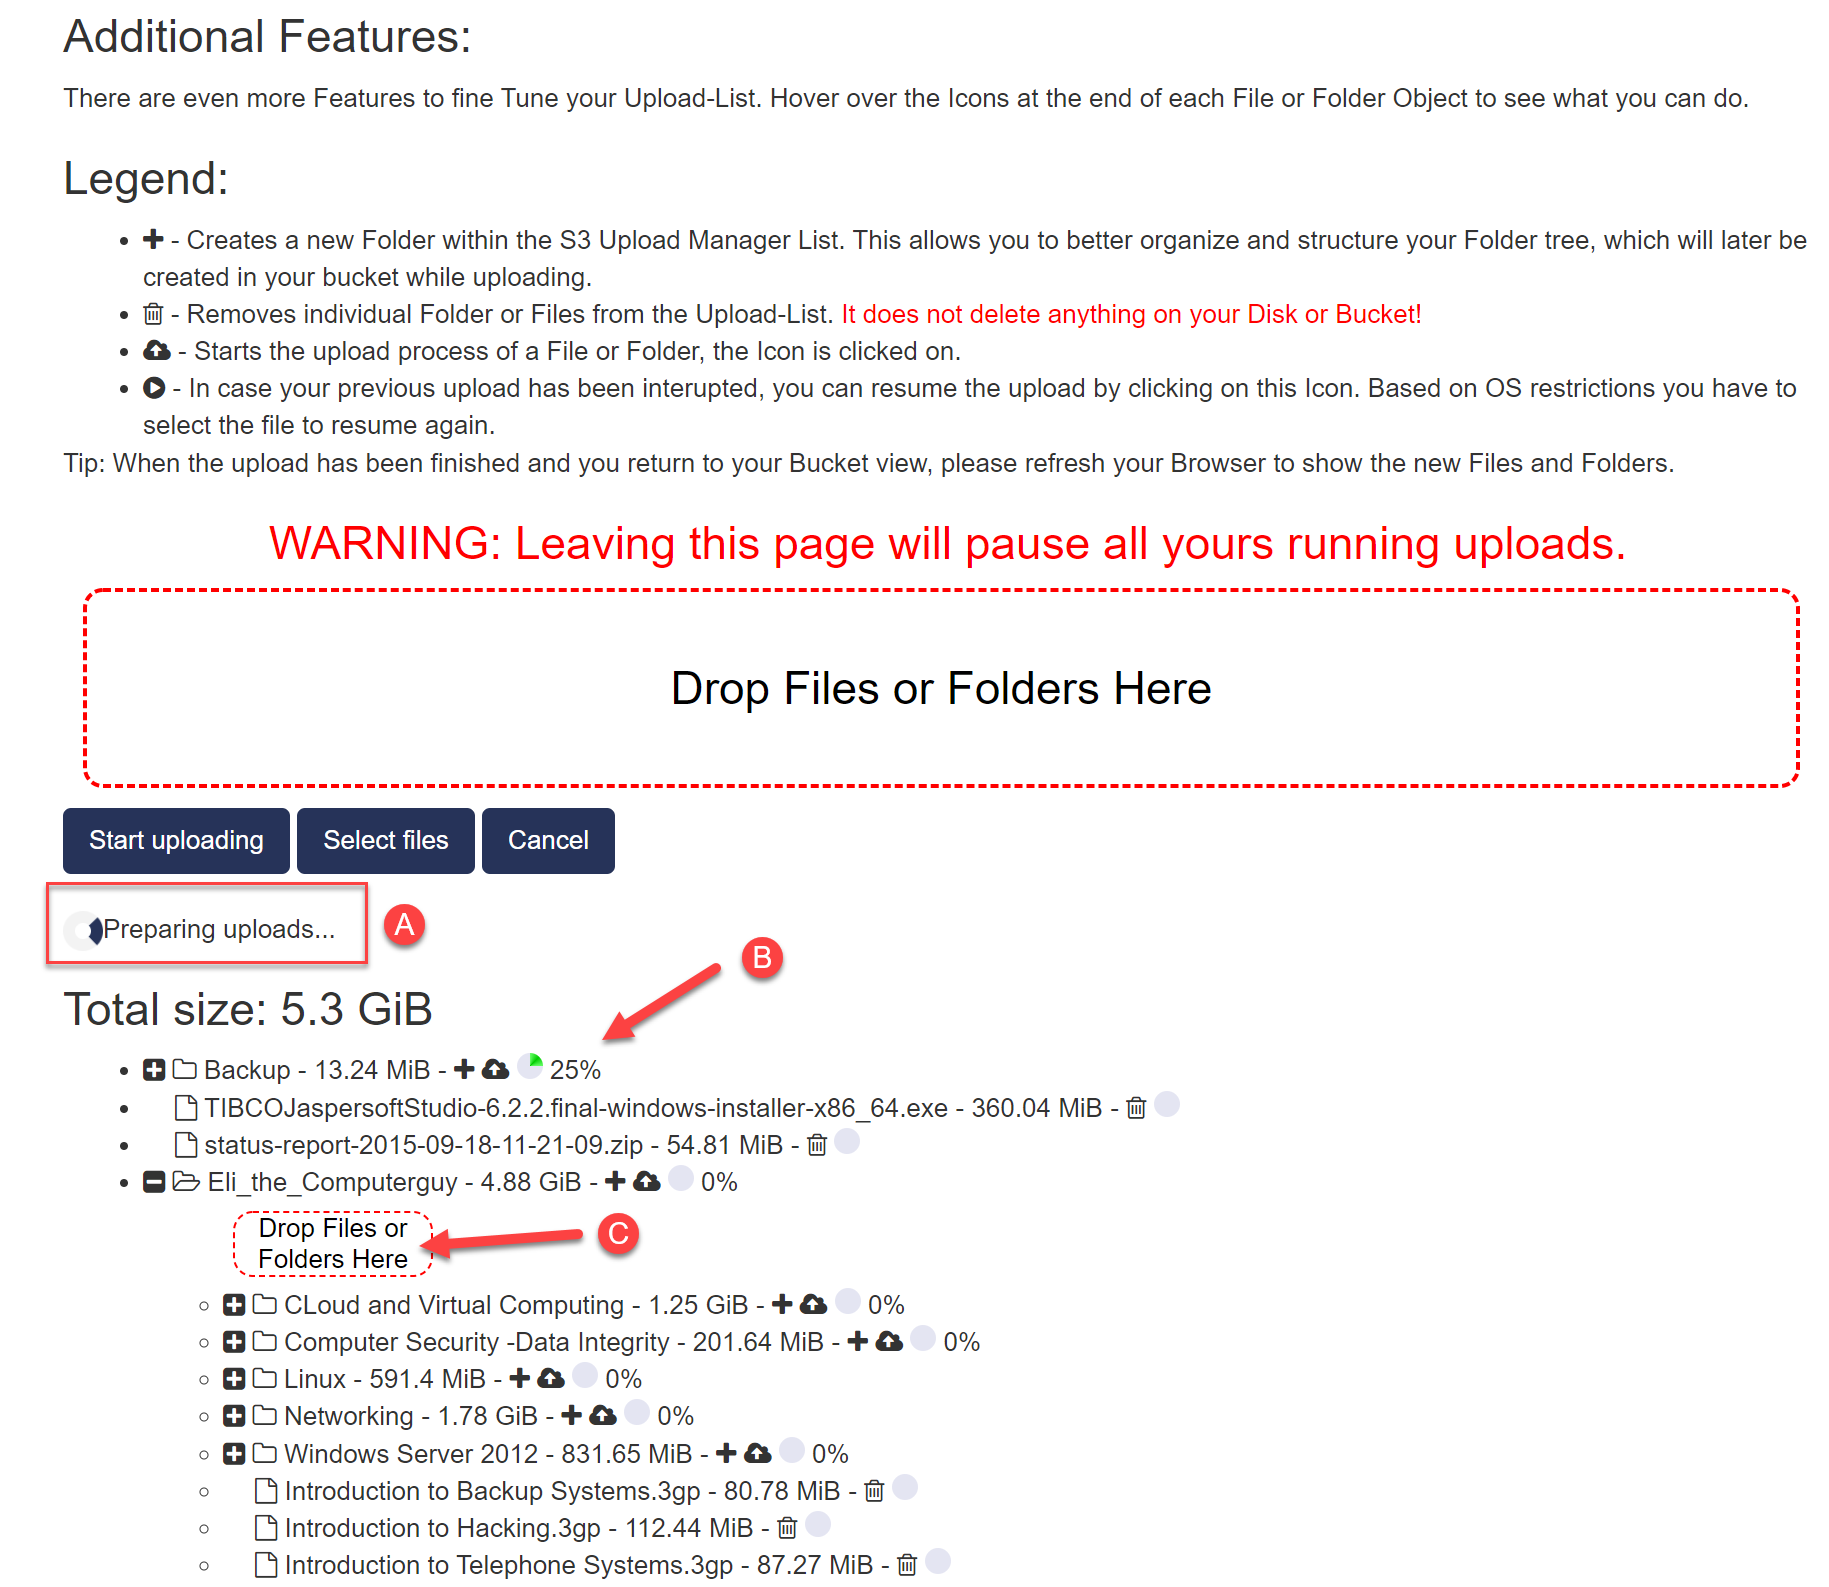
- While compiling the upload list, the objects are listed below Total size.
- You can delete individual objects in the upload list or add more (C).
- After clicking on the button Start uploading (3) an animation (A) Preparing uploads appears until the actual upload starts.
- The status of the loading process is displayed in the object list on the right (B).
Note
You can switch the browser TAB during the upload process and continue working in the Cloud Service Portal or another application until the upload is finished. If you close the S3 Upload Manager browser TAB during an upload process, the upload will be aborted and can be continued later with Resume Upload if necessary.
3.8.1. Resume Upload
If an upload was interrupted, e.g. by accidentally closing the upload browser TAB, the upload is incomplete. You now have two options.
A) Abort all uploads
To delete the interrupted upload process and the MPU files, please proceed as follows:
- To do this, navigate to S3 Object Storage on the left and then to project then to the Bucket.
- Then click on right the Upload File button(3)
- The MPU (Multi Part Upload) files (C) of the aborted upload are now displayed
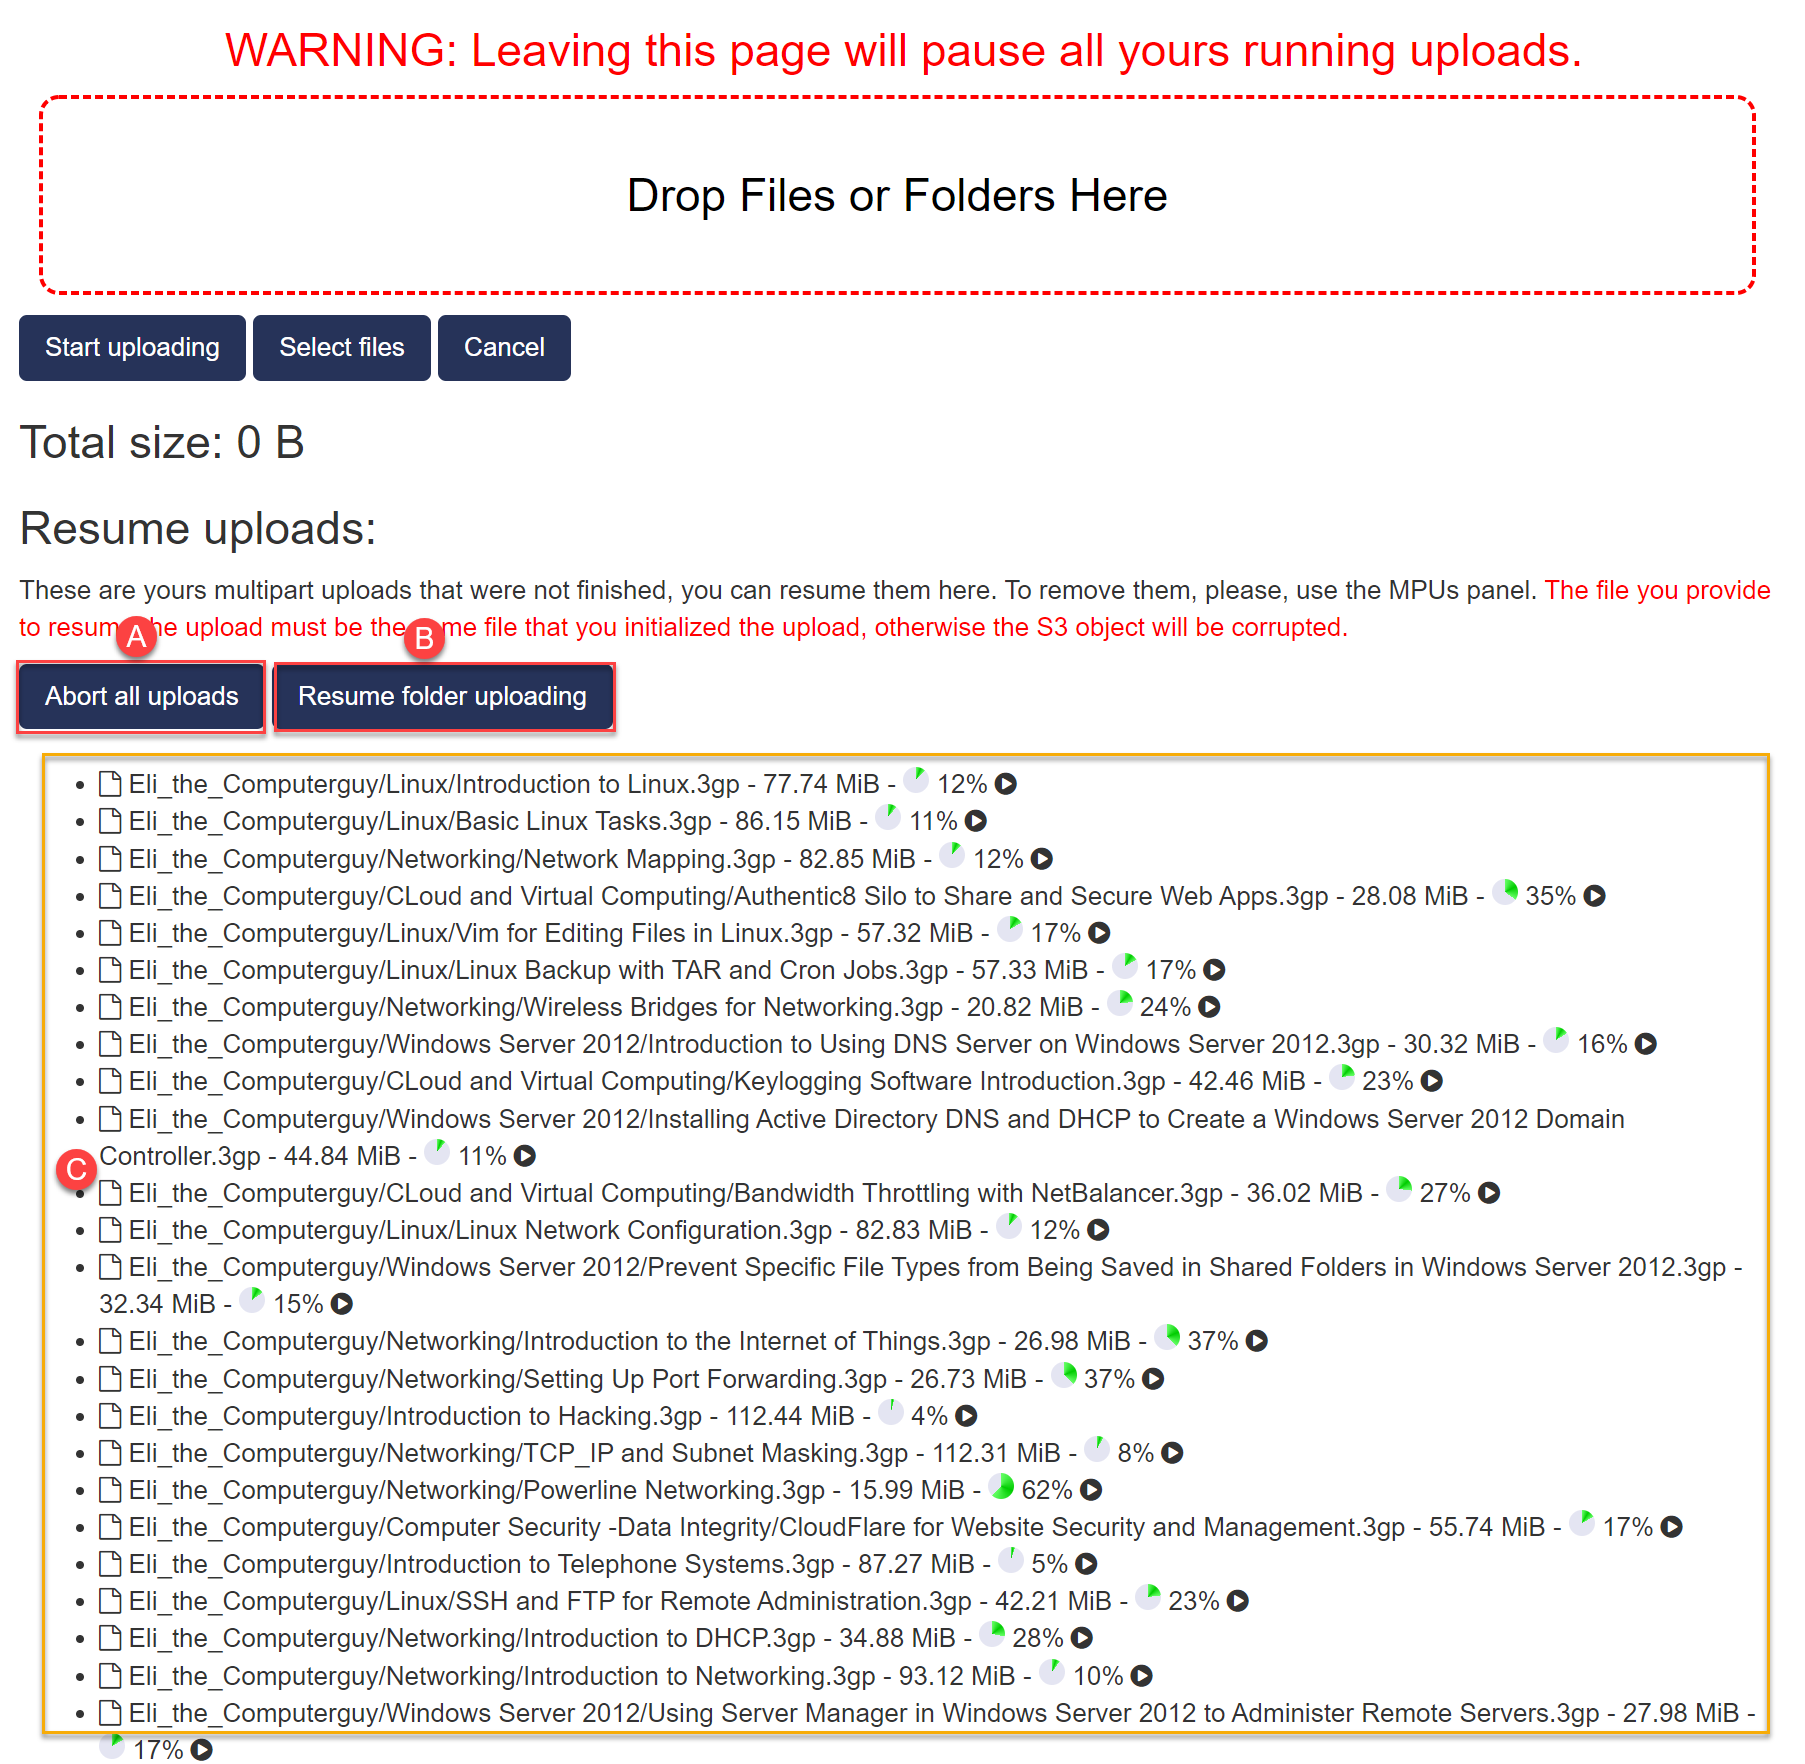
- To clean up the MPU files and the upload process, click Abort all uploads (3).
- Confirm the control question with OK
- The MPU files will now be deleted and you can close the S3 Upload Manager by clicking on the Cancel button or you can create a new Upload List.
Note
The already completely uploaded files remain in the bucket and are not deleted!
B) Resume folder uploading
To resume the interrupted upload process, please proceed as follows:
- To do this, navigate to S3 Object Storage on the left and then to project then to the Bucket.
- Then click on right the Upload File button(3)
- The MPU (Multi Part Upload) files (C) of the aborted upload are now displayed
- Now click Resume folder uploading (B).
- Now an Explorer window is opened, in which the source directory is, which you wanted to upload. Now select this directory again and confirm the next control question after the upload with the OK button.
- The upload process will now continue and the remaining objects will be uploaded.
- After the upload is complete you can close the S3 Upload Manager by clicking on the Cancel button.
3.8.2. MPU - Multi Part Upload
When uploading objects above a certain size, the files are split into multi-part upload “packages” or parts (MPU). Each part is a coherent part of the object’s data. The object parts can be uploaded independently and in any order.
If the transfer of one part fails, only the missing part is transferred again, without affecting other parts. After all parts of your object are uploaded, S3 merges these parts and creates the object.
Advantages of Mutlipart Upload (MPU):
- Improved throughput - parallel (up to 100) uploads increase throughput
- Fast recovery from network problems - The smaller part size minimizes the impact of restarting a failed upload due to a network error.
- Pause and resume object uploads - You can upload object parts spread over a time. However, you must explicitly complete or cancel the multi-part upload.
3.9. Download File
After you have created a bucket and uploaded files, you can now download individual files in the S3 panel.
- To do this, navigate to S3 Object Storage on the left and then to the project (1), then to the Bucket (2) you wish.
- Now click in the list on the file name, which will start the Download.
Note
Depending on the settings of your browser, the file will be downloaded or displayed, or in the case of an MP4 file played.
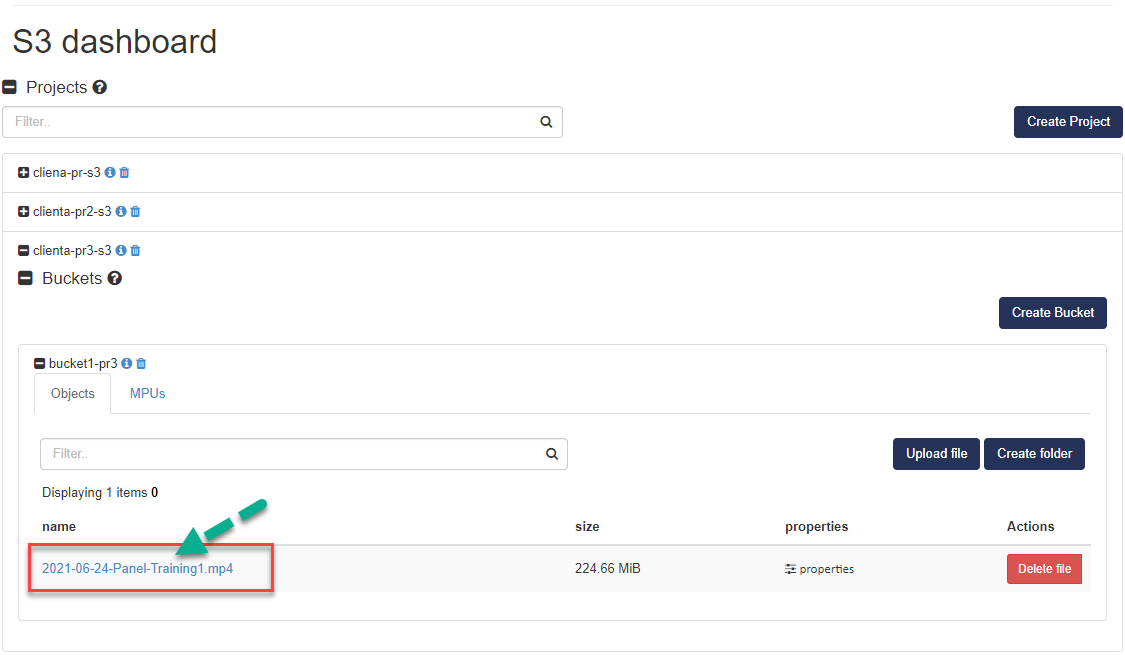
- The file will be placed in your download directory.
Note
Larger amounts of data are usually uploaded or downloaded using an external tool (e.g. S3 Explorer or S3cmd).