2. Organization Management (IAM)
Table of Contents
In diesem Bereich verwalten Sie als Enterprise Partner ihre Kunden (Clients), Users und Berechtigungen für das Cloud Service Portal©.
2.1. Client Setup
To add a new client for the Cloud Service Portal© and the offered cloud services, e.g. OpenStack, please follow the steps below:
- Create Client - Creates the client account in the Cloud Service Portal© and the link to the uProvide account
- Enable Client Services - Enables a cloud service for a customer (client)
- Create Client User - Creates a client user and permissions to access the portal and cloud services
Note
The detailed user permissions for the individual panels (e.g. OpenStack, S3, USAGE) of the Cloud Service Portal can be configured under Dashboard Management => Manage Permissions ( Dashboard Management).
2.1.1. Create Client
To create a new client, please log into uProvide and first create an “Uprovide account” with the address and contact details for this new client. Now switch to the area of the created up-account and click on Services new.
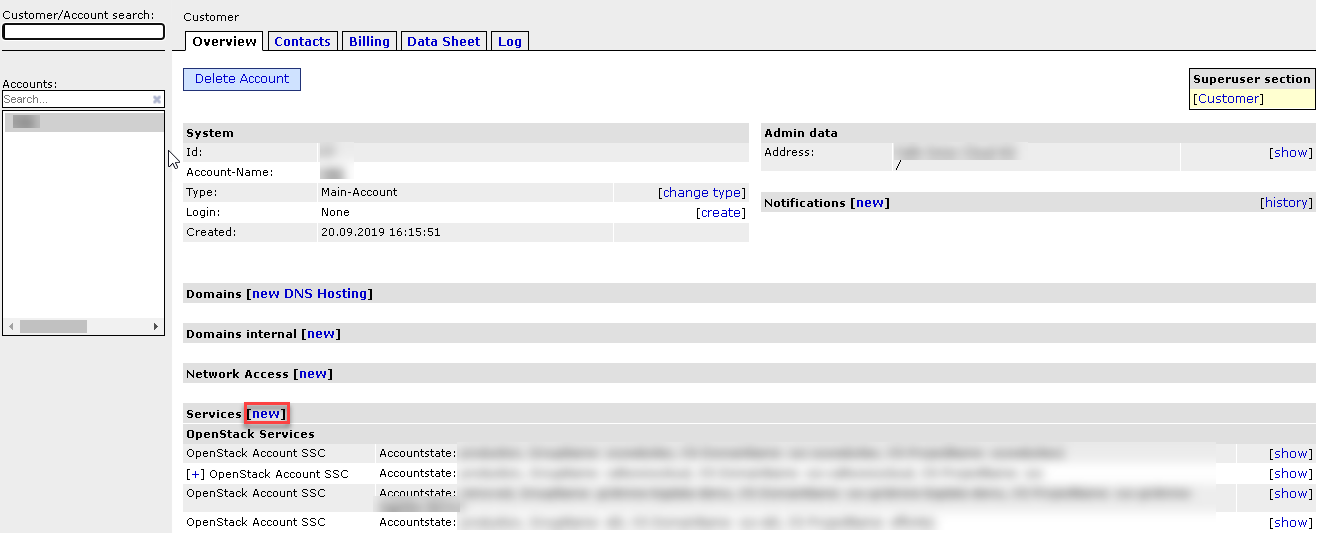
- Now select the corresponding service Cloud Service Portal Client in the EW Cloud section.

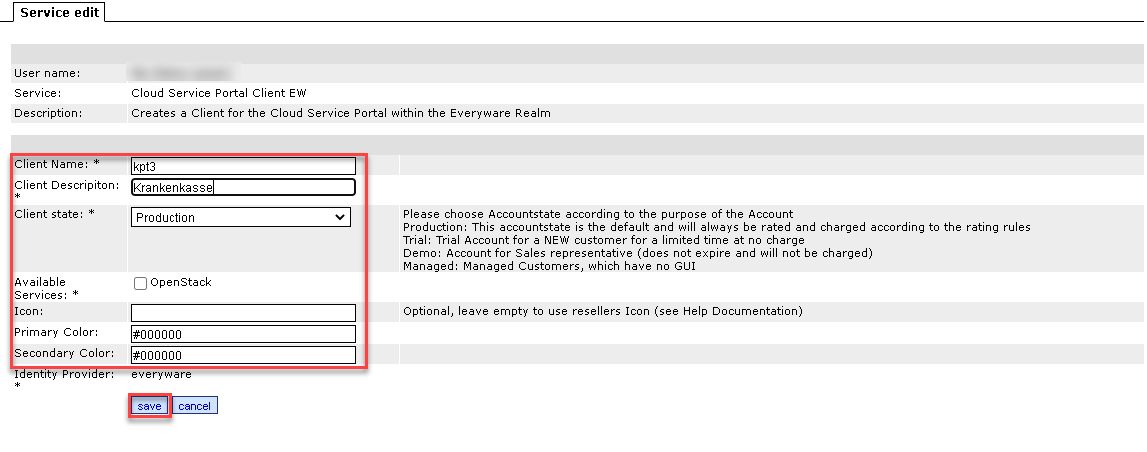
- Please fill out the client form and then click on create
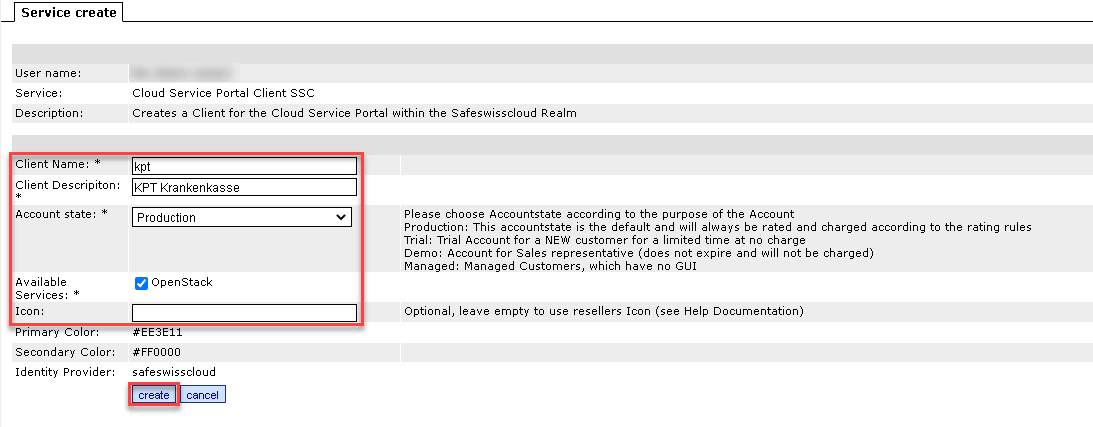
- Client Name: Enter the client name here
- Client Description: Enter a description of the client here
- Client state: Select the state of the client here (e.g. Trial, Demo, Production, Managed)
- Available Services: Tick the service [1] (e.g. OpenStack) which you want to enable for the client.
- Primary color: Initial default values are specified here, which you can change later with Edit Service. The colors affect the main menu of the client dashboard as well as the different forms. The values are in HexDec.
- Secondary color: Here you can set the secondary color of the client dashboard. The values are in HexDec.
- Icon: Optional können Sie hier die URL zu einem Icon des Client eingeben, welches in der oberen Linken Ecke auf dem Client Dashboard angezeigt wird. Wenn Sie dieses Feld leer lassen, wird das Icon des Enterprise Partner angezeigt.
Sie haben nun einen Client Account im Cloud Service Portal in ihrem Enterprise Partner Realm angelegt und mit dem eben erstellten Uprovide Account verknüpft. Diese Verbindung wird später für das Billing und die Zuordnung der genutzten Services und Ressourcen (USAGE) verwendet. Sobald der Kunde / Enterprise Partner ein OpenStack Projekt erstellt, wird es hier als SubService mit den USAGE Daten angezeigt (siehe uProvide autocreate OpenStack SubServices).
| [1] | The OpenStack Service needs to be enabled for the S3 Object Storage Service and Panel to be turned on and used. |
Now log in to the Cloud Service Portal, create a User for this client and enable the desired Services and permissions.
Note
Sie benötigen hierzu die Berechtigungen auf Stufe Enterprise Partner
2.1.2. Enable Client Services
Note
The OpenStack Service needs to be enabled for the S3 Object Storage Service and Panel to be up and running.
For a service such as OpenStack to become available to a client, you must select it and activate it once.
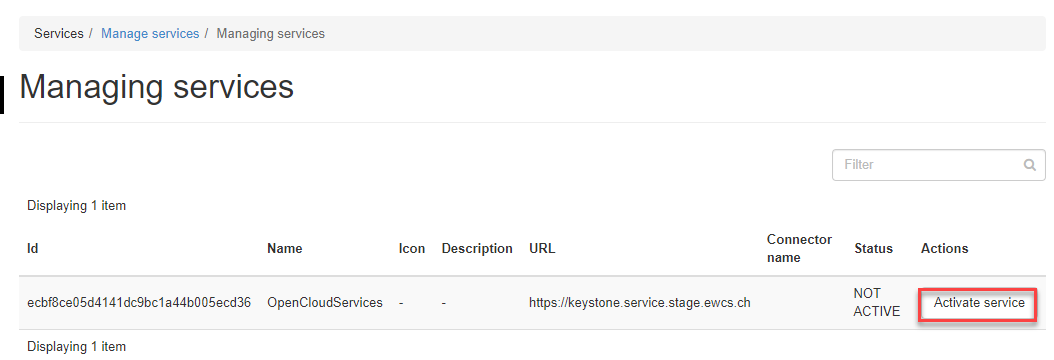
- To do this, navigate to the client area at the top and click Services`then :guilabel:`Services in the navigation on the left.
- Now please click on the action button Activate Service and watch how the status changes from Not ACTIVE to ACTIVE. The service is now activated for the Client. Now activate the service for the desired users of the client.
- Now create a user for this client if not already done (see Create Client User).
2.1.3. Create Client User
In order for a client to be able to log on to the Cloud Service Portal© or to use the service, it requires a user with the appropriate permissions.
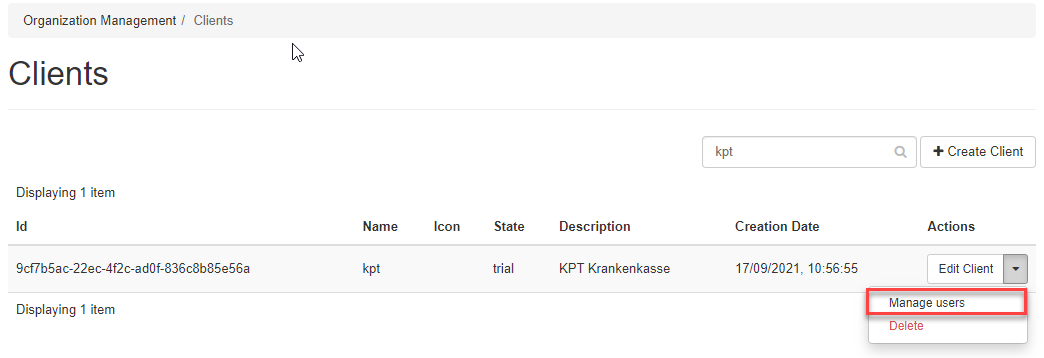
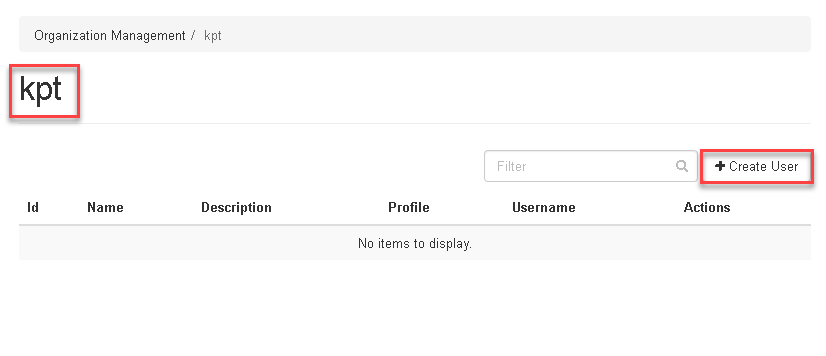
- To do this, navigate to Organization Management on the left, Clients and then click on the small arrow on the right of the line of the desired client for which you want to create a user and select Manage Users.
Note
Use the filter options to reduce the client list
- You are now in the User Management of this client. Now click the button +Create User to create a user for this client.
- Then fill in the fields accordingly:
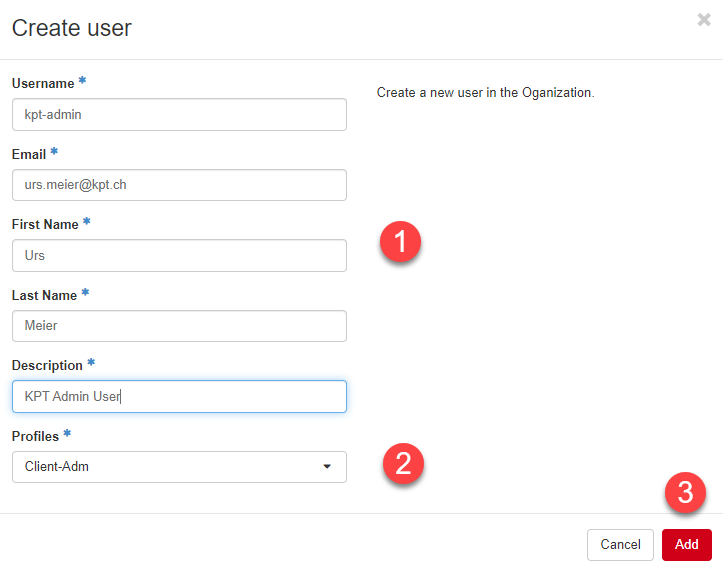
- User data: Please enter the user data [2] here
- Profiles: Select the desired profile for the Cloud Service Portal permissions for the user here. With the Client-Adm profile, the user can create and manage his own permission profiles for his client [2]
- Add: Then click Add to complete the process.
Note
After clicking Add a success message appears briefly with the initial password, which you can reset at any time (see Reset Client User Password ).
| [2] | Profiles - You can create your own individual user permission profiles in the Dashboard Management, which you can then select here(see Create Enterprise Partner Profile). |
2.2. Edit Client
You may want to change the information about a client, unlock a service (e.g. Openstack), or customize the appearance of the client dashboard. To do this, please log in to uProvide and switch to the corresponding “Up-Account” in which the client service you want to customize is located.
- Now click on the corresponding Services and then on Edit.

- Now make the desired adjustments and finish the process with save.
Note
This data is transmitted to the Cloud Service Portal via API. A corresponding message appears on the screen (black box).
- Then click Back to return to your service.
2.3. Reset Client User Password
Um als Enterprise Partner das Passwort eines Client User zurückzusetzen, gehen Sie bitte wie folgt vor:
- Navigate to Organization Management >> Users on the left side and click on the small arrow on the right side of the line of the desired user for which you want to reset the password and then Reset password.

- A message New password: appears with the new password, which you can give to the customer.
2.4. uProvide autocreate OpenStack SubServices
Im uProvide erstellt ein täglicher UP-Batchjob, welcher um ca. 23:00 läuft, automatisch die SubServices (OpenStack) der Uprovide-Services “Cloud Service Portal Client EW” und “Cloud Service Portal Client SSC. Somit erscheinen OpenStack Projekte, welche ein Kunde/Enterprise Partner über das “Cloud Service Portal” erstellt, automatisch am nächsten Tag als SubService im uProvide/upBusiness des entsprechenden Kunden.

From this point on, the USAGE and rating data will also be displayed within this service. The USAGE data collection itself starts at the same time as the creation of an OpenStack project.

2.5. Decommissioning of a Trail / Demo Client
Deleting OpenStack projects and the associated services and resources is done manually and preferably by the customer for security reasons.
Note
A trail account was usually not charged and will not be charged again. This means that no more USAGE data is required for this account and its services.
Procedure:
- Clean communication with customer a) extend b) will be deleted by date (create ticket for tracking)
- Der Kunde/Enterprise Partner löscht im OpenStack Management Portal (Horizon) sämtliche Resourcen (VM’s,Volumes,Snapshots,VR,…)
- Der Kunde/Enterprise Partner löscht via Cloud Service Portal oder API das Openstack Projekt und alle User des Trial Account
- Der Enterprise Partner erstellt einen Task im Ticket mit einem Auftrag zum löschen des SubService „OpenStack“ im Uprovide Account des Trial Kunden.
- EW deletes the SubService “OpenStack” in the Uprovide account of the trial client (creates an UP-LOG entry) and sets the Client State to Disabled
- EW deletes the Client Service Portal service after 6 months
- EW deletes the Up account if no other services are used after 6 months
Note
For the delete request, the following minimum information is required: a) client name, b) project_id and project-name of the service to be deleted
2.6. Decommissioning of a Production Client
Procedure:
- The customer creates a ticket for cancellation/deletion order
- Clean communication with customer - a) Identify cancellation/deletion request through e.g. call back (KYC), b) Verify authorization of requester.
- The customer deletes all its resources (VMs, volumes, snapshots, VR,…) in the OpenStack Management Portal (Horizon)
- Der Kunde/Enterprise Partner löscht via Cloud Service Portal oder API das Openstack Projekt und alle User des Account
- Der Enterprise Partner erstellt einen Task im Ticket mit einem Auftrag zum löschen des SubService „OpenStack“ im Uprovide Account des Kunden.
- EW checks whether there are still open settlements and, after they have been settled, executes the deletion of the “OpenStack” sub-service in uProvide and sets the client state to Inactive
- EW deletes the Client Service Portal service after 6 months (before that check if no new OS projects were created)
- EW deletes the Up account if no other services are used after 6 months
Note
The allocation continues until all resources (USAGE) have been deleted (point 3).
3. Dashboard Management
With the help of User Profiles, you can ensure that certain groups of users always receive the same permissions. The selected permissions are stored in a user profile, which you can then select when creating a user. This makes it much easier to manage the permissions of users. Also, you can easily change the permissions centrally for all users who use a particular profile.
Die Verwaltung dazu finden Sie im Menüpunkt Dashboard Management. Im folgenden Kapitel des Enterprise Partner Manual werden nur die Enterprise Partner spezifische Funktionen und Möglichkeiten beschrieben.
3.1. List profiles
Für Enterprise Partner stehen neben den zwei Standard User Profilen (A & B) ein Enterprise Partner Profile (C) zur Auswahl.
- User-Adm - Can manage all users of this client and has access to all panels
- User has access to the S3 panel and cannot manage users.
- Client-Adm Can manage all users and clients of your realm and has access to all panels
To list the details of the profiles, go to Dashboard Management => Profiles.
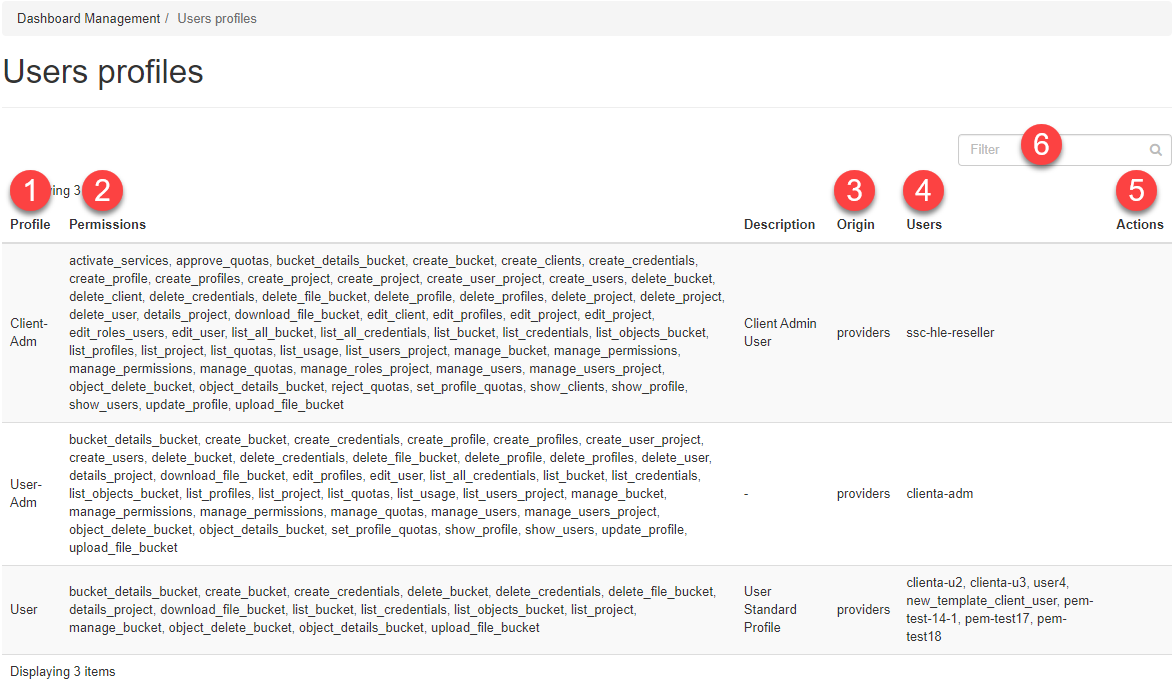
- Profile - Name of the profile
- Permissions - Lists all permissions of this profile, including a description
- Origin - Shows which role created this profile
- Users - Shows which users are using this profile
- Actions - Here you can add a description to your profiles or delete the profile.
- Filter - Here you can filter for any information you want
3.2. Create Enterprise Partner Profile
Um ein neues Enterprise Partner Profil zu erstellen, gehen Sie bitte wie folgt vor:
To do this, navigate to Dashboard Management => :guilabel:`Manage permissions`on the left
- Klicken Sie bei einem User mit einem Enterprise Partner Profile (Client-Adm), welches als Vorlage dient auf permissions
- The permission sections for this user are displayed.
- Now switch to the corresponding Permission section, which you want to adapt for the new profile. In our example Organization_Management (1)
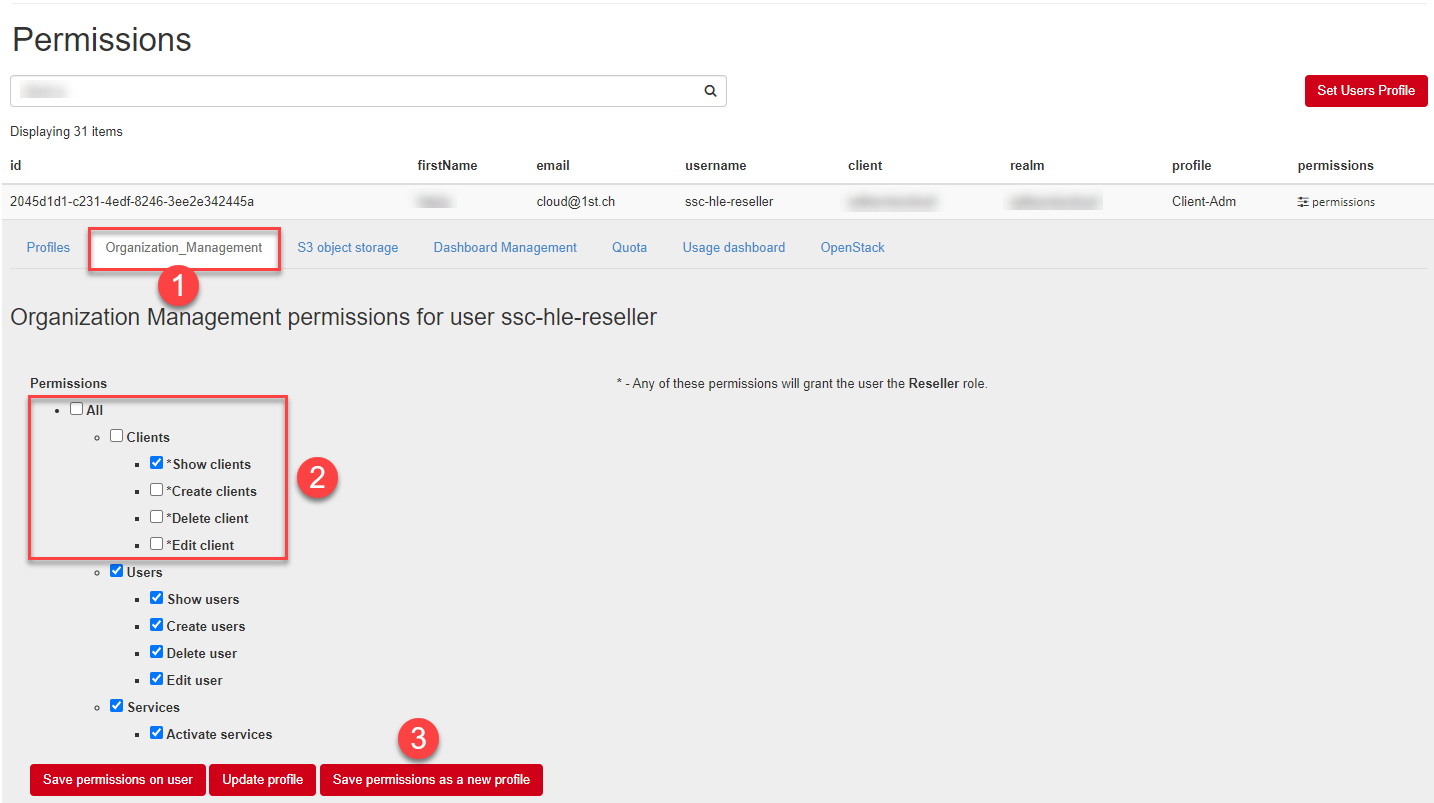
- Erteilen Sie nun die gewünschten Berechtigungen (2). Belassen Sie mindestens eine Clients (2) Berechtigung (z.B. Show clients) damit das neue Profile NUR für Enterprise Partner User sichtbar bleibt.
- To save the profile with the adjusted permissions as a new profile, please click on the Save permissions as a new profile button (3).
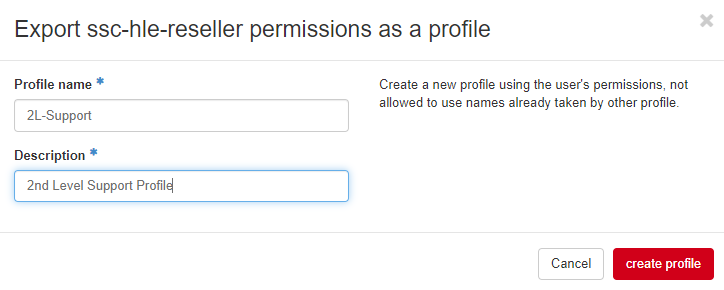
- Now enter a Profile Name and a Description for the new profile in the input mask and confirm the entry with the create profile button.
Note
The user’s profile remains unchanged by the creation of the new profile.
Warning
Durch die Vergabe ( Change Profile) eines Client Permissions Profile erhält ein User Enterprise Partner Rechte und kann somit andere Clients verwalten (dont’t do this)!
3.3. Create Client User Profile
Sie können für ihre Clients ein User Profile erstellen, wie es unter Create Profile beschrieben ist. Voraussetzung: Das Profile darf im Abschnitt Organization_Management KEINE Client Berechtigungen enthalten! .. note:: User Profile welche Sie als Enterprise Partner erstellen sind automatisch für alle ihre Clients sichtbar.
4. Quota Management
Das Quota Management ist ausführlich im Client User Manual (siehe Quota Management) beschrieben, weshalb sich dieser Abschnitt auf die zusätzlichen Funktionen eines Enterprise Partner beschränkt.
4.1. Manage permissions
Hier können Sie als Enterprise Partner unter Quota dann in Manage permissions die Berechtigungen zum Quota Panel für ihre und die User ihrer Clients vergeben. Klicken Sie hierzu rechts auf der Zeile des betroffenen User auf die Schaltfläche Manage permissions.
Note
If you do not grant a user permissions for the Quota Panel, it will not appear in the navigation for this user.
4.2. Quota Overview
Im Unterschied zu einem Client, finden Sie als Enterprise Partner analog unter Quota Overview die Quotas all ihrer Clients.
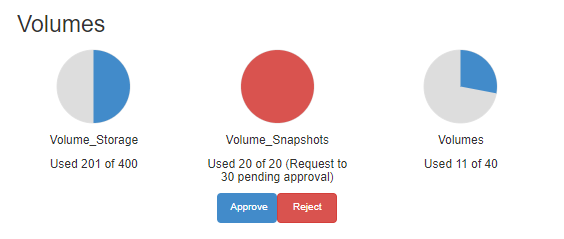
4.2.1. Approve Client quota request
In addition to the client Quota Management functions, you can process a Client quota request from a client here and answer it with one of the Approve or Reject buttons.
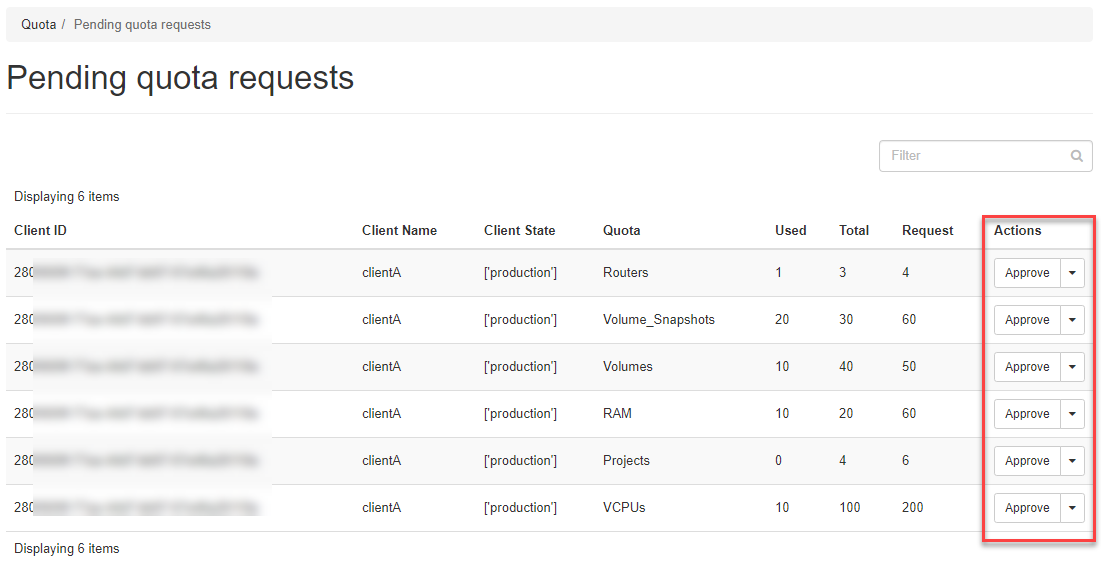
Additionally you have another menu item Pending quota requests in which you can list and edit all quota requests of clients in tabular form.
4.3. Create globale Quota Profiles
Zur einfacheren Verwaltung ihrer und der Ressourcen ihrer Clients können Sie Quotas erstellen, wofür sie unter Create Quota Profiles eine Beschreibung finden. Als Enterprise Partner können Sie auch erstellte Quota Profile für ihre Clients sichtbar und auswählbar machen.
- To do this, check the Inheritable box when creating a quota profile.
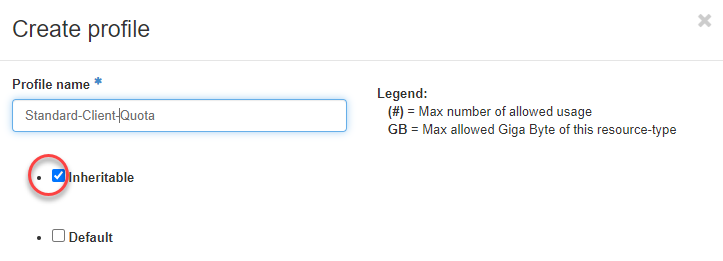
Note
Your clients can use profiles they have shared, but they cannot edit them.
4.4. Create Client Quota Profiles
Alternatively, you could create a quota profile for one of your clients.
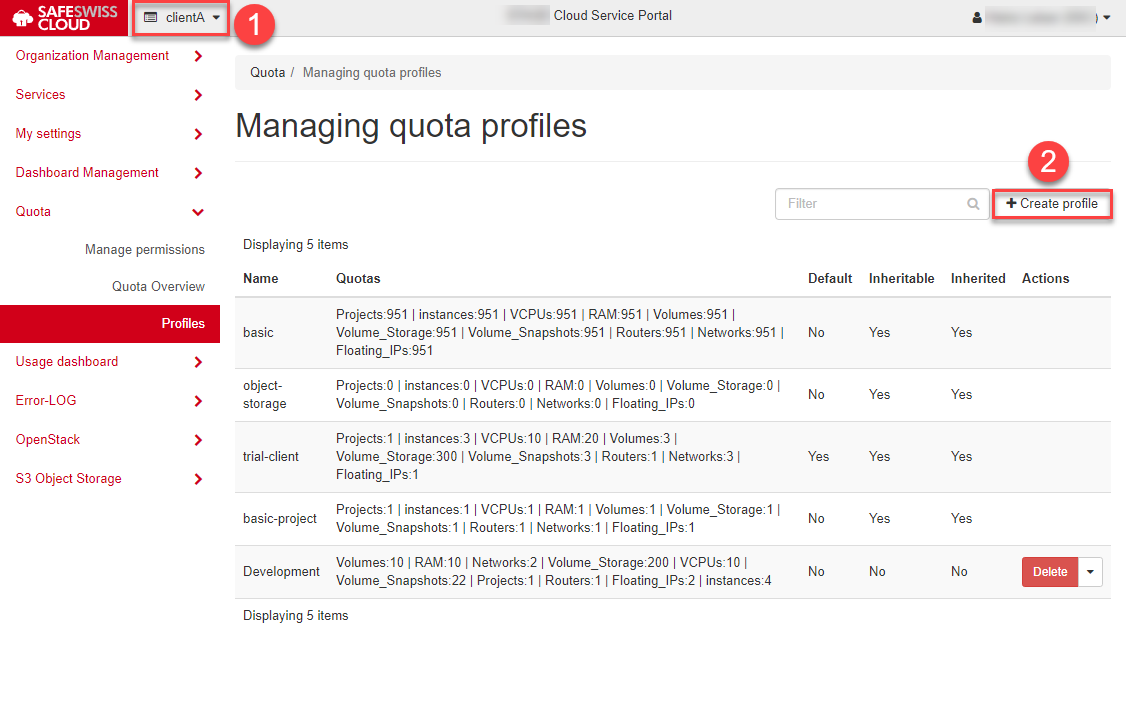
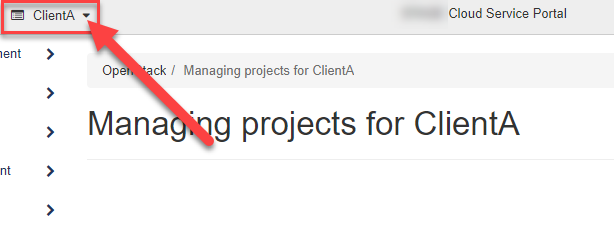
- To do this, navigate at the top to the area of the Client (1) for which you want to create a quota profile and then click on Quota in the navigation on the left and then on Profiles.
- Now click on the Create profile button (2).
- Then fill in the form and confirm with the create button.
For more information, see Create Quota Profiles.
5. Create Client OpenStack Project
To create an OpenStack Project for a client,
- Make sure that you are in the area of the corresponding client. If not, first navigate to the area of the Client for which you want to create a project.
please follow the instructions in the following chapter Create OpenStack Project.