8. Kubernetes Management
Table of contents
8.1. Introduction
Kubernetes has established itself as the de facto standard for container orchestration and enables the automation of deployment, scaling and management of containerized applications on a large scale.
Our Kubernetes service in our new cloud portal offers you a powerful and managed Kubernetes environment. This means we take care of the complex setup, maintenance and management of the Kubernetes control plane (master nodes), so you can concentrate fully on the development and operation of your applications.
This service is seamlessly integrated into our cloud portal and uses the robust infrastructure of OpenStack and Gardener to provide the worker nodes. You can also benefit from the simple integration with other portal services such as our S3-compatible object storage and the central backup service.
This service is aimed at developers, DevOps teams and system administrators who are looking for a scalable, reliable and easy-to-manage platform for their containerized workloads.
This documentation guides you through all the necessary steps: from the prerequisites to the creation and configuration of your first cluster through to day-to-day management and scaling. We explain the specific functions and options available to you in our cloud portal.
8.2. Prerequisite
These prerequisites are necessary to create a Kubernetes cluster in the Cloud Servies portal.
- A valid account in the Cloud Services Portal.
- Necessary authorizations/roles in the portal to be able to create Kubernetes clusters.
- Sufficient quota (vCPU/vRAM/storage) for creation
- possibly local tools (kubectl, k9s …)
8.3. First steps
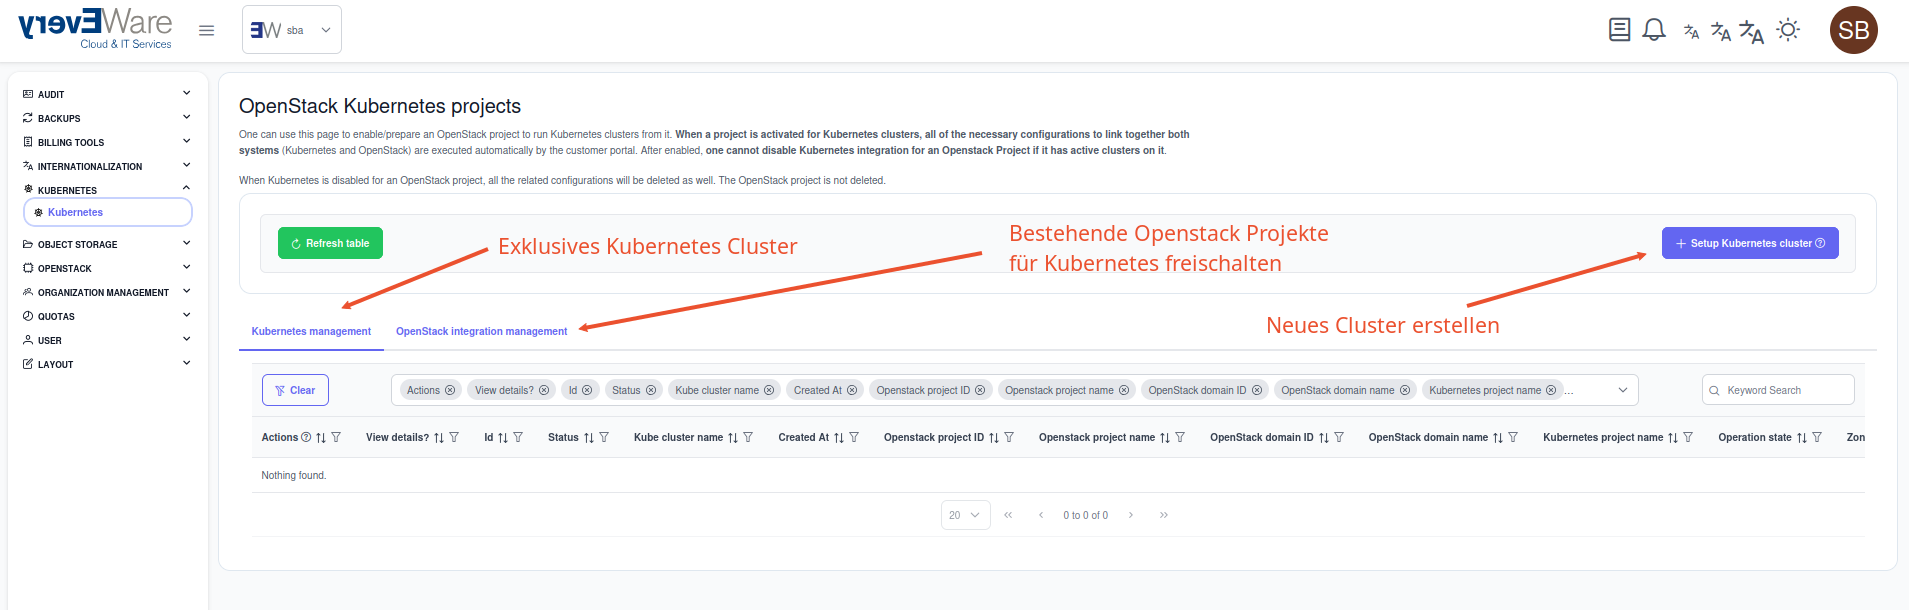
We offer you two options for creating your Kubernetes cluster in our Cloud Services Portal:
- As a new project
- into an existing project
8.4. Create a cluster
To create a cluster, a project with sufficient quota is required. The step-by-step instructions refer to the wizard creating an independent project. If a project already exists, the selection of the project name and size is of course not necessary.
8.4.1. Step by step
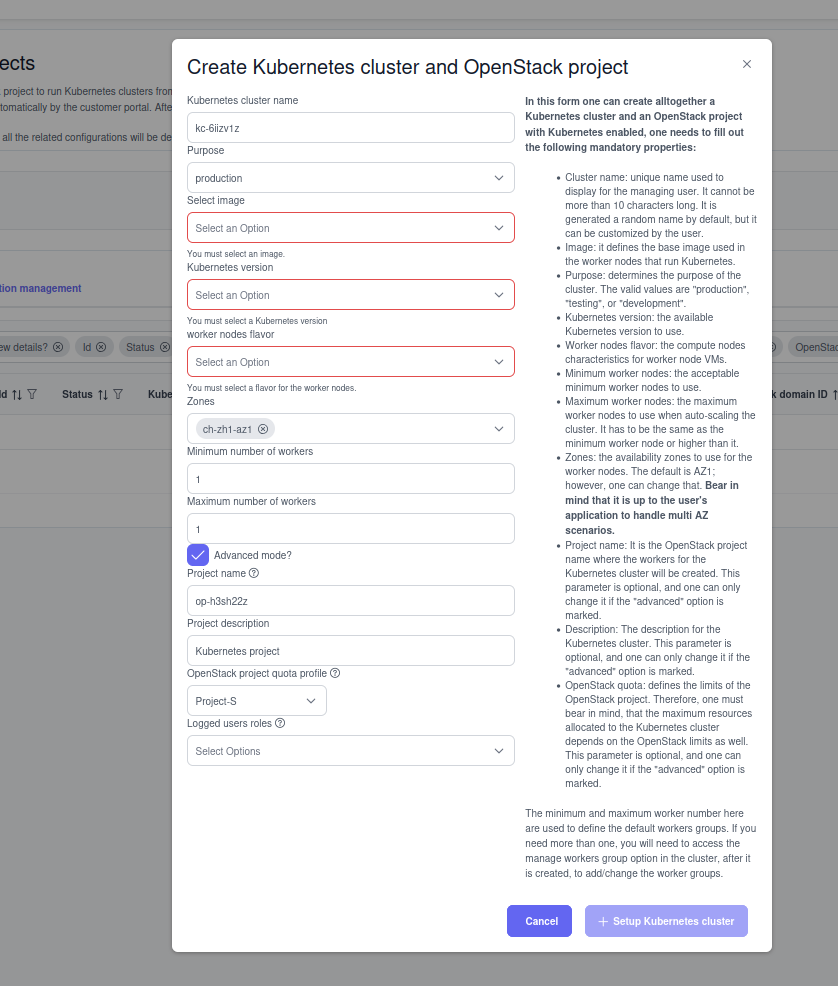
Basically, the wizard is very easy to use and relatively clear with the form fields for creating a cluster.
- Cluster name -> Must not be longer than 10 characters.
- Purpose
- testing -> No monitoring, no HA of the Kubernetes controller components.
- production -> Monitoring and HA of the controller components.
- Image -> The desired worker image version can be defined here. Changing this later is not supported.
- Kube version -> The required Kubernetes version can be defined here. This can only be upgraded afterwards but not downgraded.
- Flavor -> The possible openstack flavor for the workernodes is defined here.
- Zones -> The distribution of the worker nodes to our various AZs is defined here.
- Number of workers -> The minimum and maximum number of workers can be set here. Our service may recognize load peaks and activate more workers/resources for the cluster accordingly.
Note
Please note that this process can take up to 10 minutes depending on the number of workers.
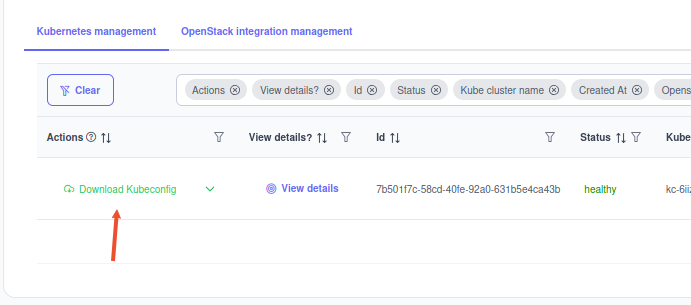
As soon as the cluster has been created, it appears in the list:

8.5. Accessing clusters
If the Kubernetes cluster has been created and is in healty status, you can have both an admin config and a viewer config created.
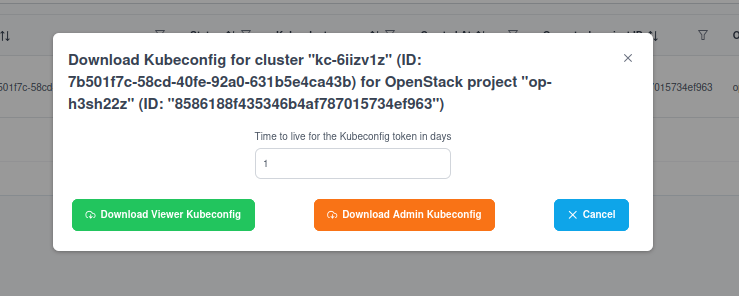
Warning
Please note that these accesses are only valid for 24 hours for security reasons, regardless of the number of days in the field!
8.5.1. Use Kubernetes config with Kubectl
After the download you will receive a YAML file that looks like this:
apiVersion: v1
clusters:
- cluster:
    certificate-authority-data: LS0tLS1CRUdJTiBDRVJUSUZJQ0FURS0tLS0tCk1JSUQ1akNDQWs2Z0F3SUJBZ0lRSlRoRUhBWjlrMzJMZDlnQWg5bFhGREFOQmdrcWhraUc5dzBCQVFzRkFEQU4KTVFzd0NRWURWUVFERXdKallUQWVGdzB5TlRBME1UUXhNRFExTVRsYUZ3MHpOVEEwTVRReE1EUTJNVGxhTUEweApDekFKQmdOVkJBTVRBbU5oTUlJQm9qQU5CZ2txaGtpRzl3MEJBUUVGQUFPQ0FZOEFNSUlCaWdLQ0FZRUE0aEU1CmpQUHZFNDFiUnNuUHV5a0J2WkthR3ovTWJKa3Ewb0liQzlVVlVYTW1EV0hqeWpjeHdLK0haZ2NSNG1VY0VseXQKVVk1dSt1UGF1SlpFQjk3a3hCRTY0U2h4WFdDK0VReDJzNHZBdFhjVkxadFdyTGJ4cjNrVnY4ZjUxY280SWpoOApJOGZmVk51cDVvbmpia0ZqWTQwQjg2c0gzeUg3OUoyWVEyWC9zUTZrajhDVEVxUFRRZGcvNGZ3Ymh5WUpRQVpqCjQwbHZWTTVCcndPVm1KMDEzZkkyNVlmME15dDJuUjRlMGo2TVlVZEhxclFScjh2bStXc1BzbHN0M1YzdE02YWcKQ0p3NU40VXlrSDZRUVNRcmdLS0ZmNmMrbVJNT0VIWS9WZGVack5SWWtIQmVZY2x0OVIxTkMzK3hjK2ZaM3ZyeAp5ZVFsS3NzV0x1Ly8yTElVWVlCbE5FWDhadzhuRW9Id3Q5OEZkQTN4ZHRHdXJkcGJ6MHFNZVVRK1VtblZPWTRLCldpTlR6WHkvVlpLVFFmWkFER1dJdVZxUFAxVnh0Z2I5d2tscjhRd28xVFljV25aMFRML3JLa3gvemNYK1pGbW8KbXVseUg2eTl6ZnZpdFBkWWdLT0c5MVl0Q2grM1F2bmlxbEFIUy9BZjRYL2F4Z2dsbWYwZURUaXVXMFhwQWdNQgpBQUdqUWpCQU1BNEdBMVVkRHdFQi93UUVBd0lCcGpBUEJnTlZIUk1CQWY4RUJUQURBUUgvTUIwR0ExVWREZ1FXCkJCU3hIYm9seTV4NFJXbS9aeW1ibENndllrL3d4ekFOQmdrcWhraUc5dzBCQVFzRkFBT0NBWUVBS0FIL0RBRlUKZ0Jibm5zV3JRVWppMVYxajVWNW5TWHM3K2JCT2MxSVdqT3VjSDVhc3Y3OGlHaC9WV21pblFwS0ZPNTAwWFREMgp3T29ubVN1dE9sLzFpa0E1M29Mb25TdU9JWG5vdXYzVFc2SUo1WExsT3k4QU1FY0FrQy9KN2NrdS9CZUJ1QTMvClJ2eU51U1RpN2p5S1l4WnhXZDRzYnNESkZ1Qi9ycFBhSmtEcTZYRTFCTWJOeUd2UTduZDJucXhINDBCaWtiZ2MKOEpuTjFRb2N3b25WSFR2YWtkZGtUa1E2emcraDlMcUJBdy9UR0pvdmJRM1o1bFJJUDBqdGFXVnVrNlovK3k2RApIZWdDZkMraWlOOTVpalVrY25nMkZMVE9wSm5BdHloRnNtUlFKSjM3cGZhcWxrMXNPeHoyUUIxaGpMOHRveHNTCmJwbkZURW5tclQwc29uQjhUZXgzSzlrT2FrcGVuQXZ3cG1OQXhCd2RodHpyRFdUSnAzUmx4S2F0NENLR2U0R0kKVjFrSEVkczN6RjFJK0VjOW5obXVxcEViNEdXbzNsVTJMVllwSnBscnd3QnhFbHU1TzN4b0IxM1hTME96TittTgpmdWpNemZNakkzazBpODd5cVFlRm5kcVQ4ZjJhVFFieVovYWNLdVNGTDRzV0xQTWtmTDFoQWVBOAotLS0tLUVORCBDRVJUSUZJQ0FURS0tLS0tCg==
    server: https://api.kc-6iizv1z.ew5cmpb.gardener.ewcs.ch
  name: garden-8586188f435346b4af787015734ef963--kc-6iizv1z-external
- The name corresponds to the cluster name + role
8.5.2. On your client
You can now copy this Yaml file to /home/[user]/.kube/config.
Or define an export for this that references the YAML:
export KUBECONFIG=/tmp/kubeconfig-kv-6iiuvlz-admin.yml
8.5.3. Example
Now you can simply query the cluster using the command line tool kubectl:
root@kube-trial:~/# kubectl get nodes
NAME                                                       STATUS   ROLES    AGE   VERSION
shoot--ew5cmpb--kc-6iizv1z-default-worker-z1-5c69c-mpnzr   Ready    <none>   84m   v1.31.3
In this case, the cluster only has one worker node.
8.6. Edit cluster
Use the dropdown field to access the update Form:
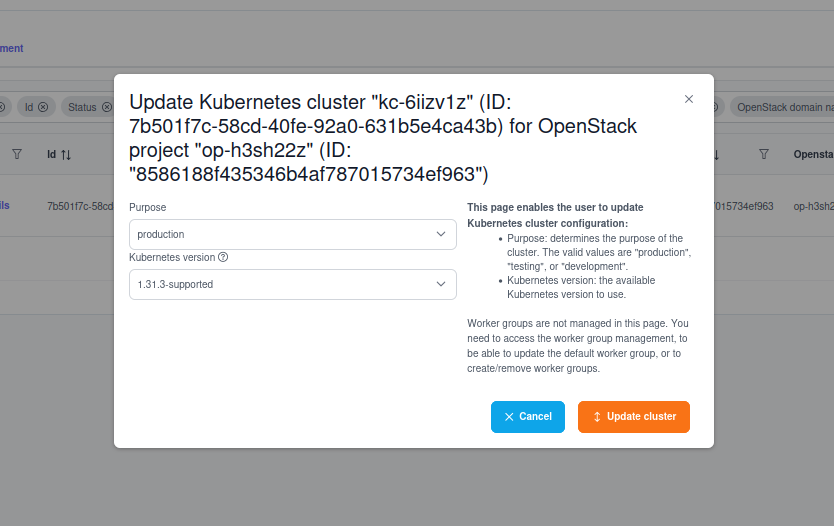
The following options are available to you here:
- Update of the Kubernetes version
- Update the purpose from
TestingtoProduction
Note
Depending on your history, you may already be in Production status. Please note that you can no longer return to the testing status, as this is not possible for technical reasons.
The same applies to the Kubernetes version of the cluster, if you have already selected the latest version, you will not be offered a newer version here. We will always try to provide you with the latest version of Kubernetes.
Warning
Please note that changes to Purpose or Version entail a larger cluster operation and therefore take time.
8.7. Worker Nodes
Your workers can be managed via the Worker-Groups dropdown.
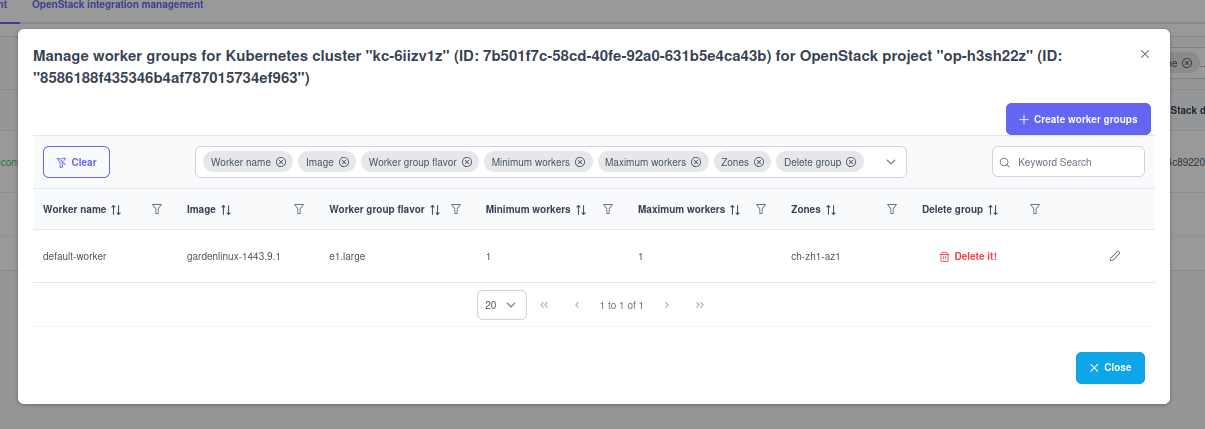
- Existing worker groups can only be edited in terms of number
- if you want to have a division over several AZs, you must create a new worker group and delete the old one if necessary.
8.7.1. Create new worker group
The ‘Create worker group’ button opens the following form in which you can define a new worker group.
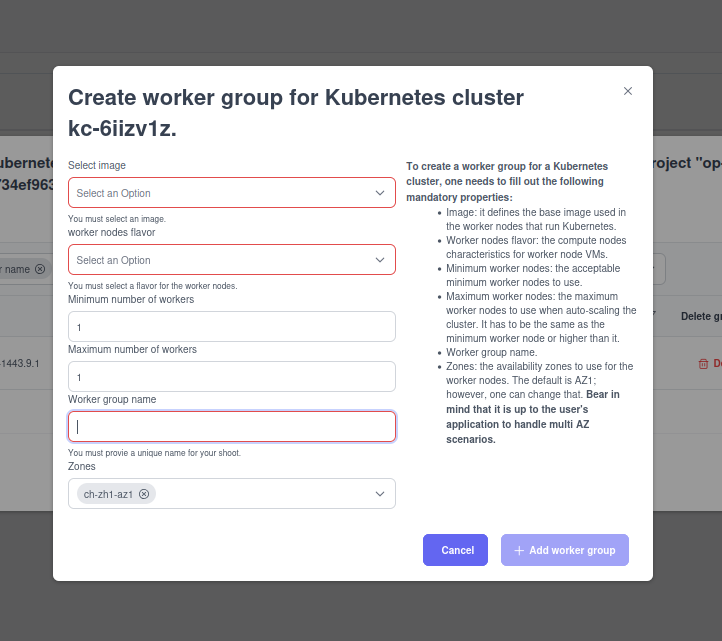
- Similar to the initial form, you can define additional worker groups for your Kubernetes cluster here.
Note
Here too, attention must be paid to the project’s quota, as this cannot be exceeded and this may lead to an error when creating the worker nodes. Please note the Notifications tab here
8.7.2. Worker Groups in Kubectl
root@kube-trial:~/.kube# kubectl get nodes
NAME                                                       STATUS   ROLES    AGE    VERSION
shoot--ew5cmpb--kc-6iizv1z-default-worker-z1-5c69c-mpnzr   Ready    <none>   127m   v1.31.3
shoot--ew5cmpb--kc-6iizv1z-test-z1-5cc9c-wb2zf             Ready    <none>   2m2s   v1.31.3
- The worker groups are distinguished by their names.
8.7.3. Delete worker group
The existing worker groups can be deleted up to a group so that the cluster remains functional.
Warning
Depending on the deployment and definition of the worker-node affinity, it can happen that one of your worker groups cannot be deleted, as otherwise the integrity of your deployment is not guaranteed.
Deleting the groups is initiated via the ‘Delete it’ button.
Note
Please note that this process also takes time, as the nodes are “drained” and pods have to be moved.
8.8. Delete cluster
Deleting the cluster is just as easy as with the worker groups; the entire cluster can be deleted via the dropdown on the cluster management page.
Prerequisites for deleting a cluster:
Warning
Clusters on which deployments are still running cannot be deleted !!!